There are multiple ways to format a USB drive on your computer. We’ve compiled the top ways to format a USB drive on your Windows 11 PC.
1. Format a USB Drive Using File Explorer
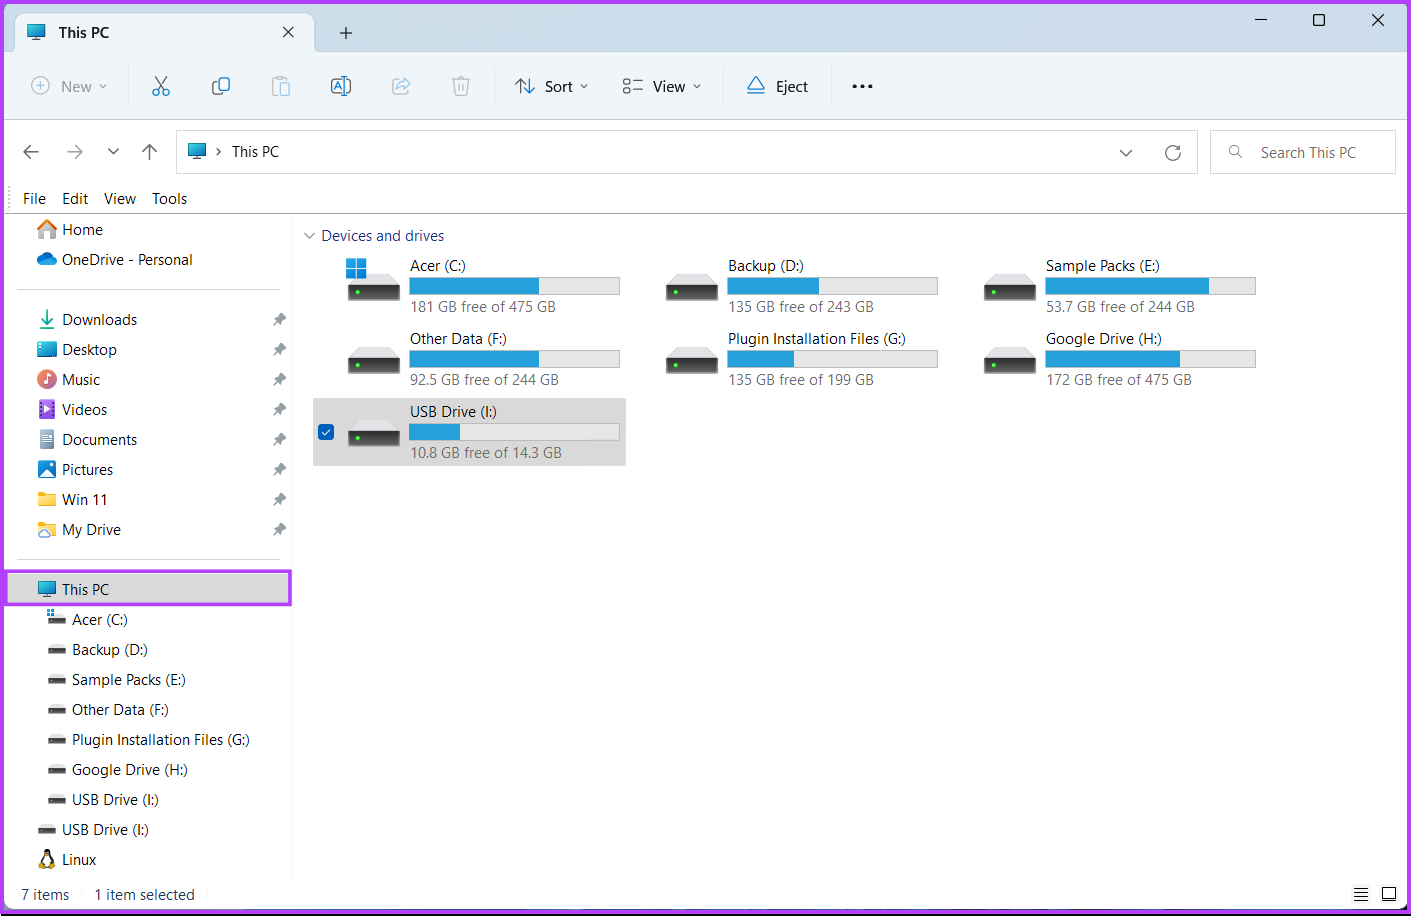
The File Explorer offers a quick and direct way to format USB drives on your Windows 11 PC. However, the File Explorer needs to detect your USB drive first to format it. Follow the steps below to format your USB drive using File Explorer: Step 1: Press the Windows + E keys to open File Explorer and click on This PC on the left column.
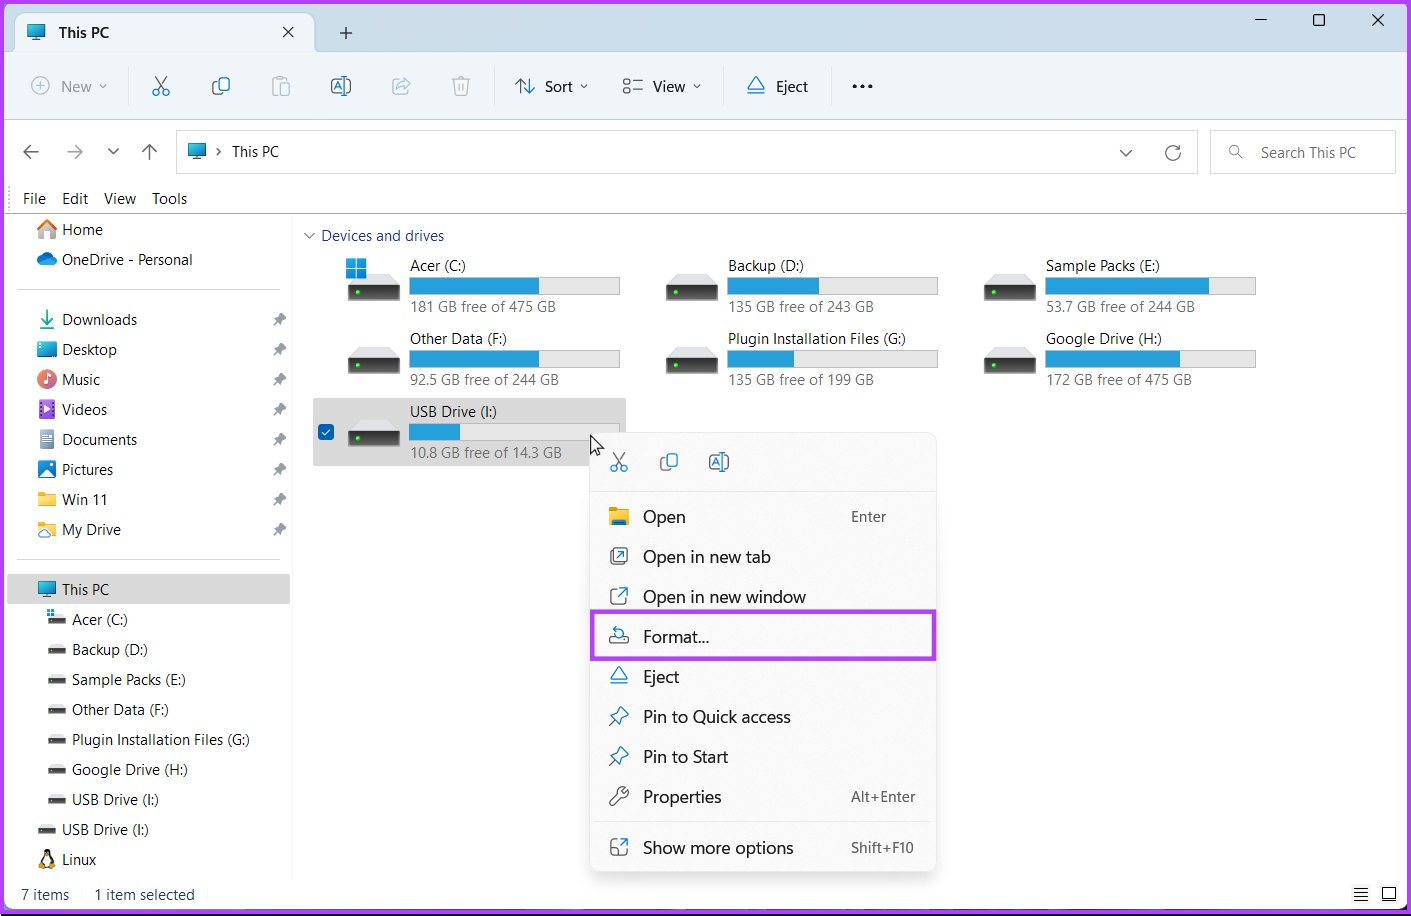
Step 2: From the right pane, right-click on the USB drive you want to format and select Format from the contextual menu that opens.
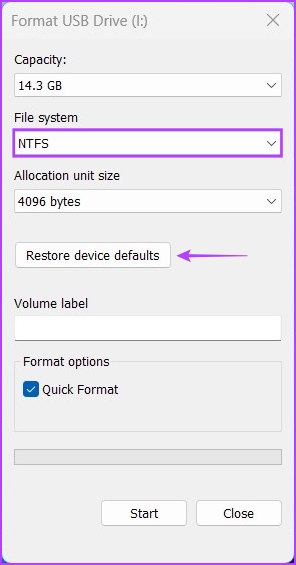
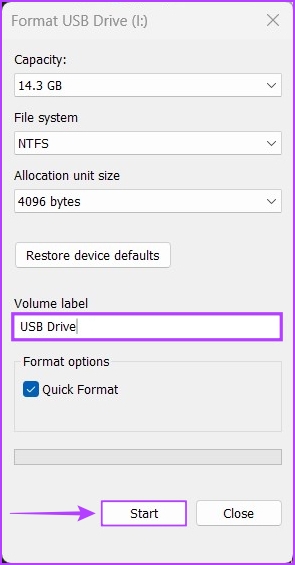
Step 3: Click on the File System drop-down and select one of the file system formats:
Choose NTFS to use the USB drive only on Windows. Select exFAT to use the drive on both Windows and macOS. Go for FAT32 to use it between different platforms, but the maximum file size for transfer will be 4GB only.
Meanwhile, if you’re unsure about the file system, click on the ‘Restore device defaults’ button before proceeding to the next step. . Step 5: Click on the text box below the Volume label and type in a name for the USB drive. Then, click on start.
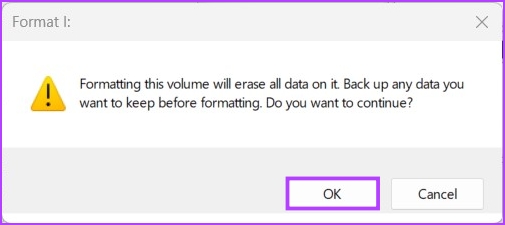
Step 6: Click on OK when a confirmation dialog appears.
2. Format a USB Drive Using the Settings App
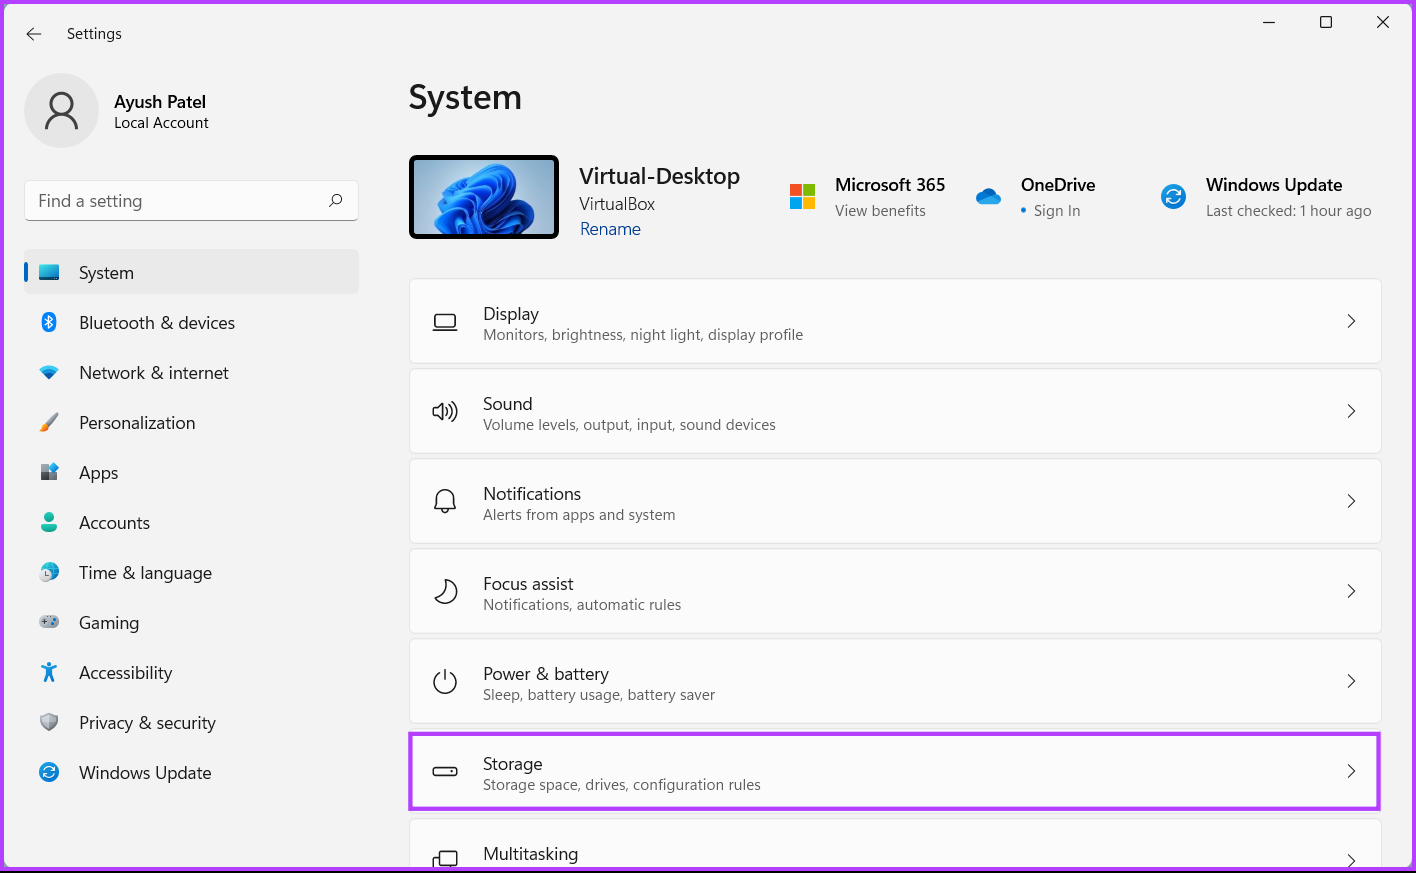
Unlike its earlier iterations, the new and improved Settings app found on Windows 11 makes it easy to perform storage-related operations. Whether it’s creating partitions or formatting a drive, the new and redesigned Settings app on Windows 11 can do it all. Here’s how you can format a USB drive using the Settings app on your Windows 11 PC: Step 1: Press the Windows + I keys to open the Settings app. Click on System in the left column and click on Storage in the right pane.
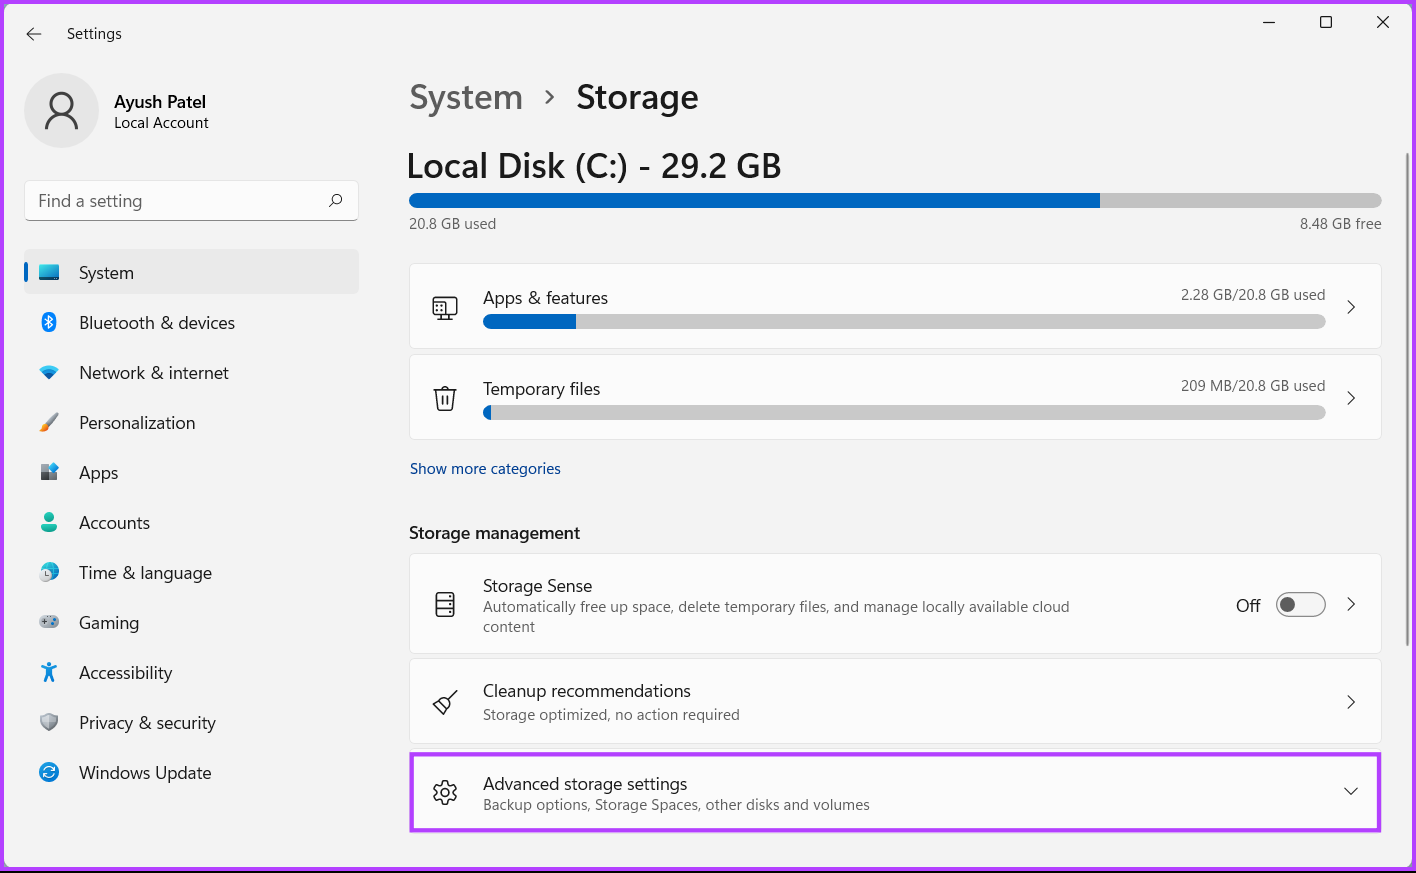
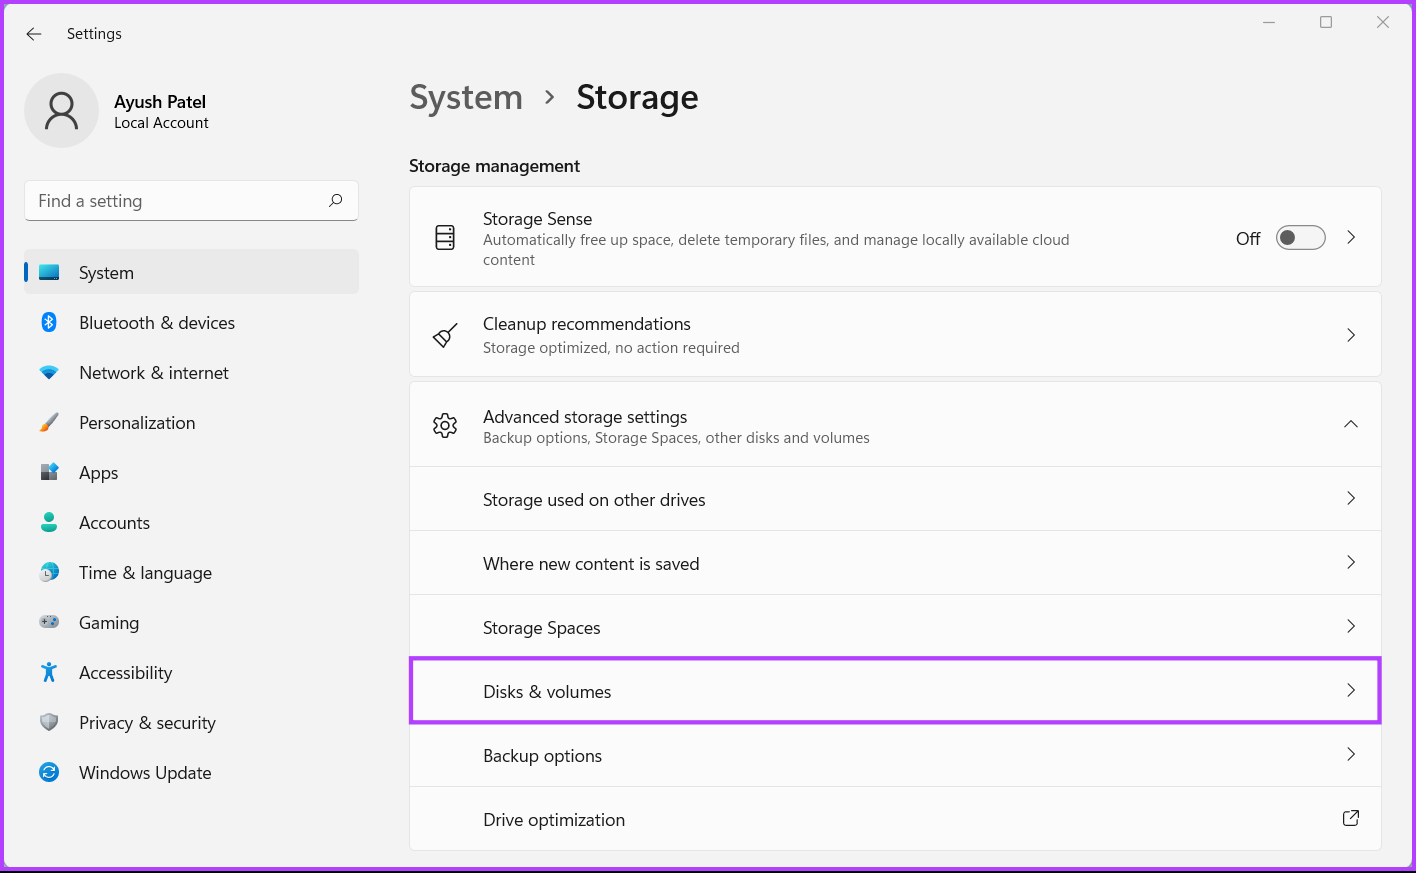
Step 2: From the Storage screen, click on ‘Advanced storage settings.’
Step 3: From the ‘Advanced storage settings’ drop-down, click on ‘Disks & volumes.’
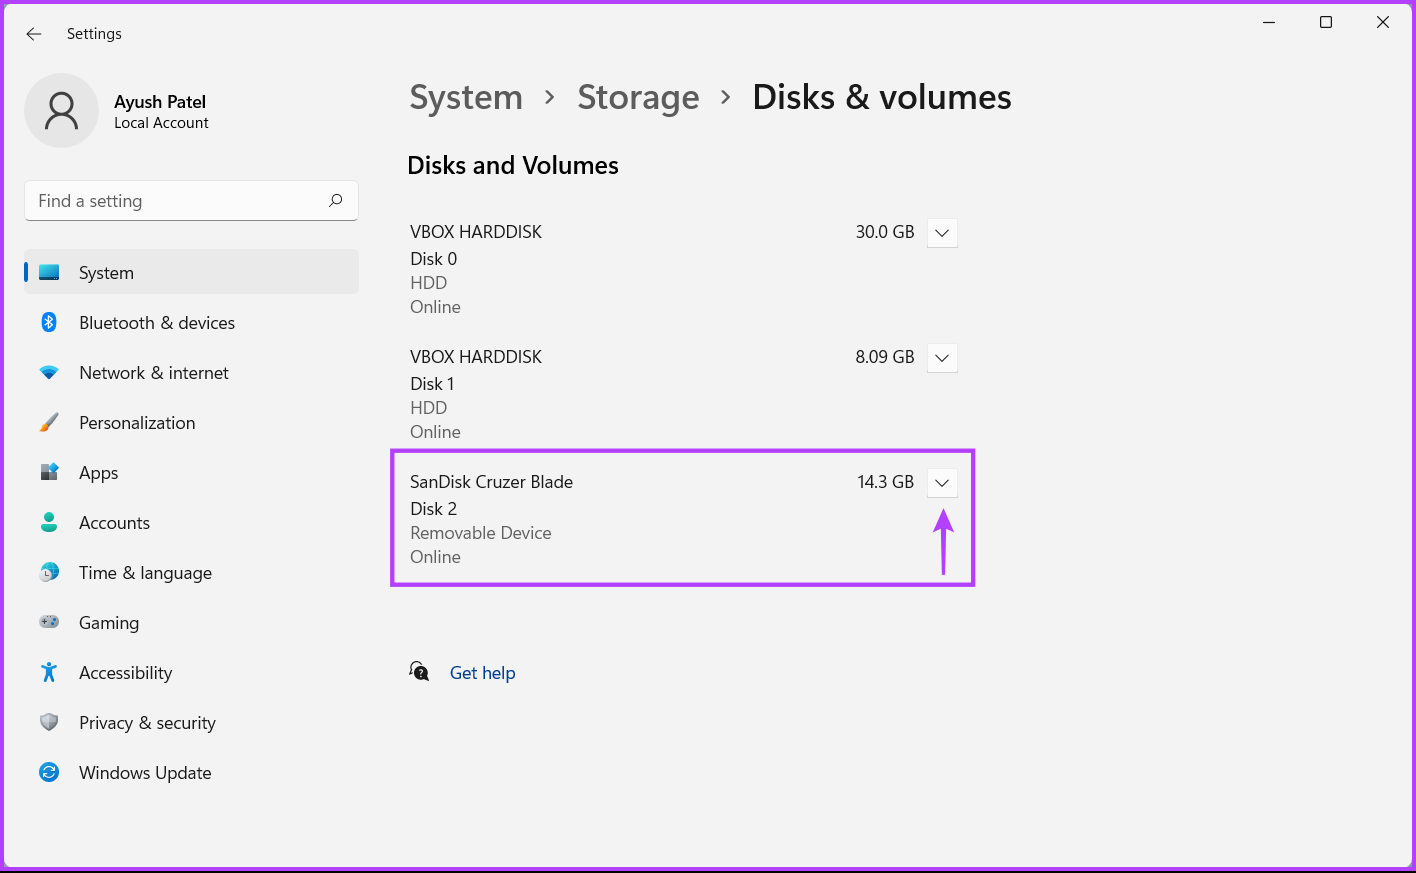
Step 4: Next, click on the drop-down arrow next the USB drive you want to format.
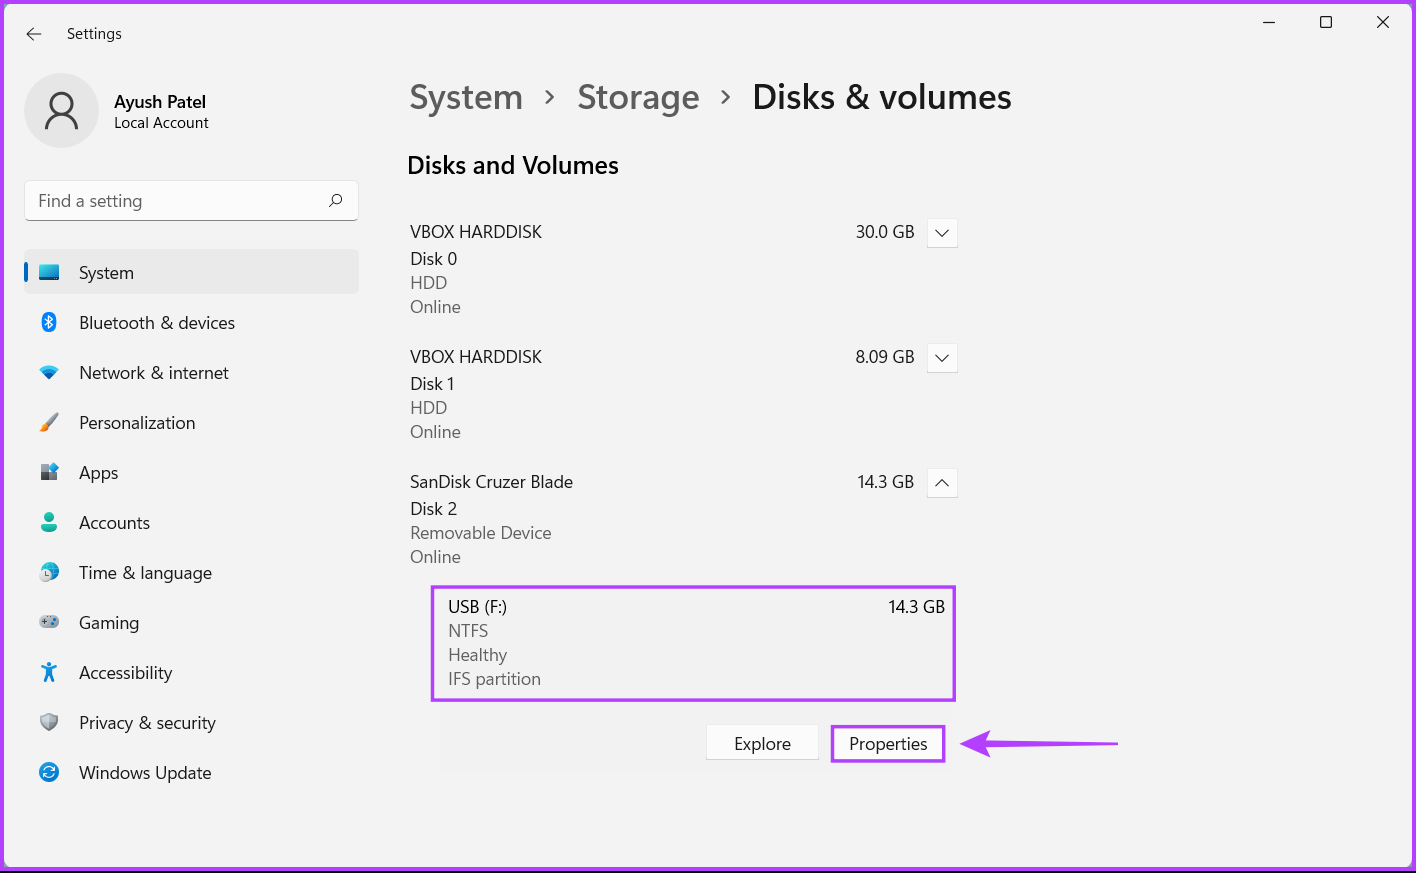
Step 5: Click on the USB drive’s letter, in our case it is USB (F:). Then click on the Properties button that appears right below it.
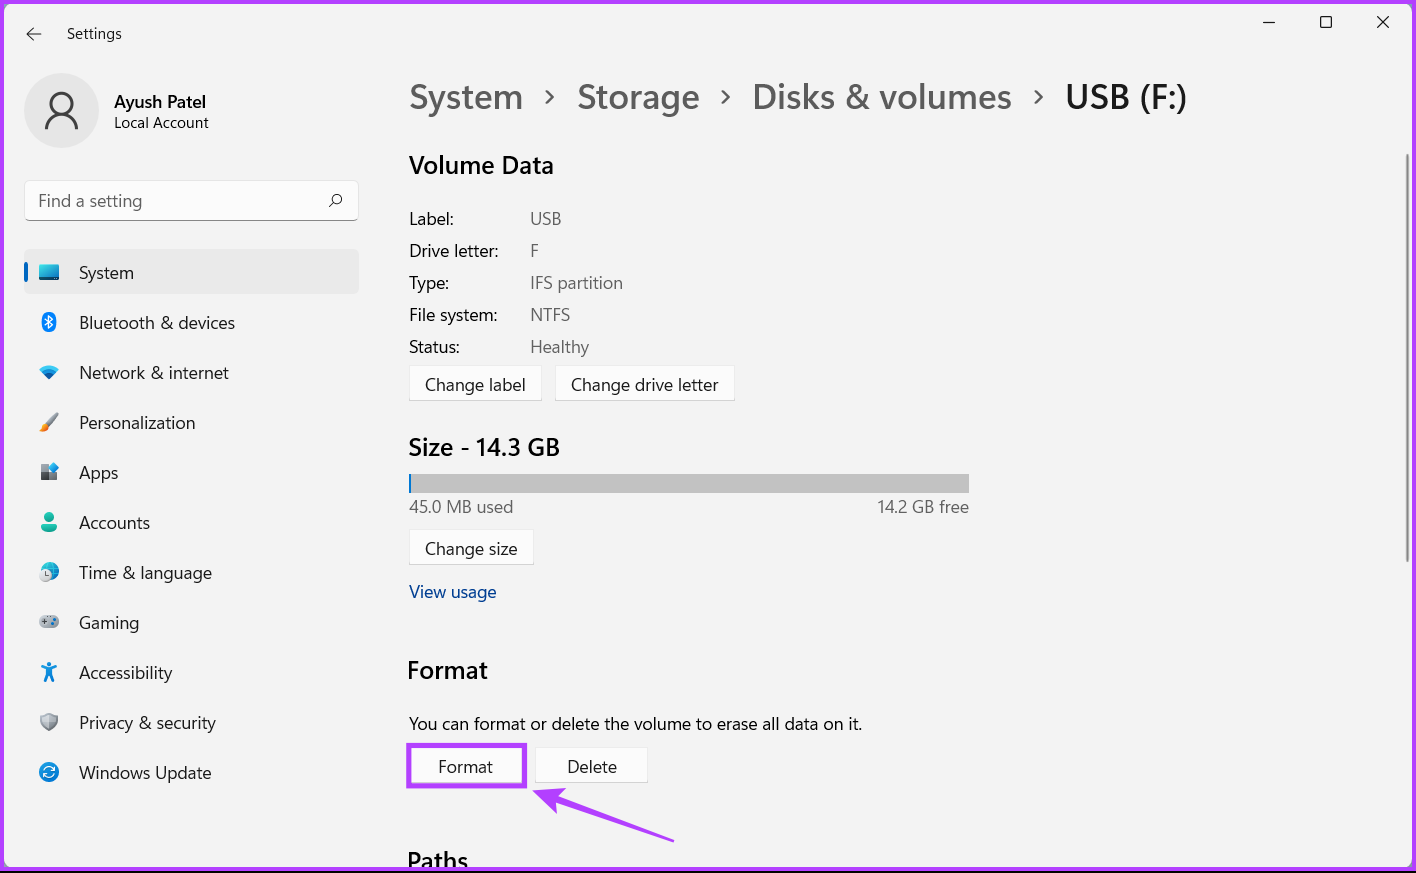
Step 6: Click on the Format button as denoted in the image below.
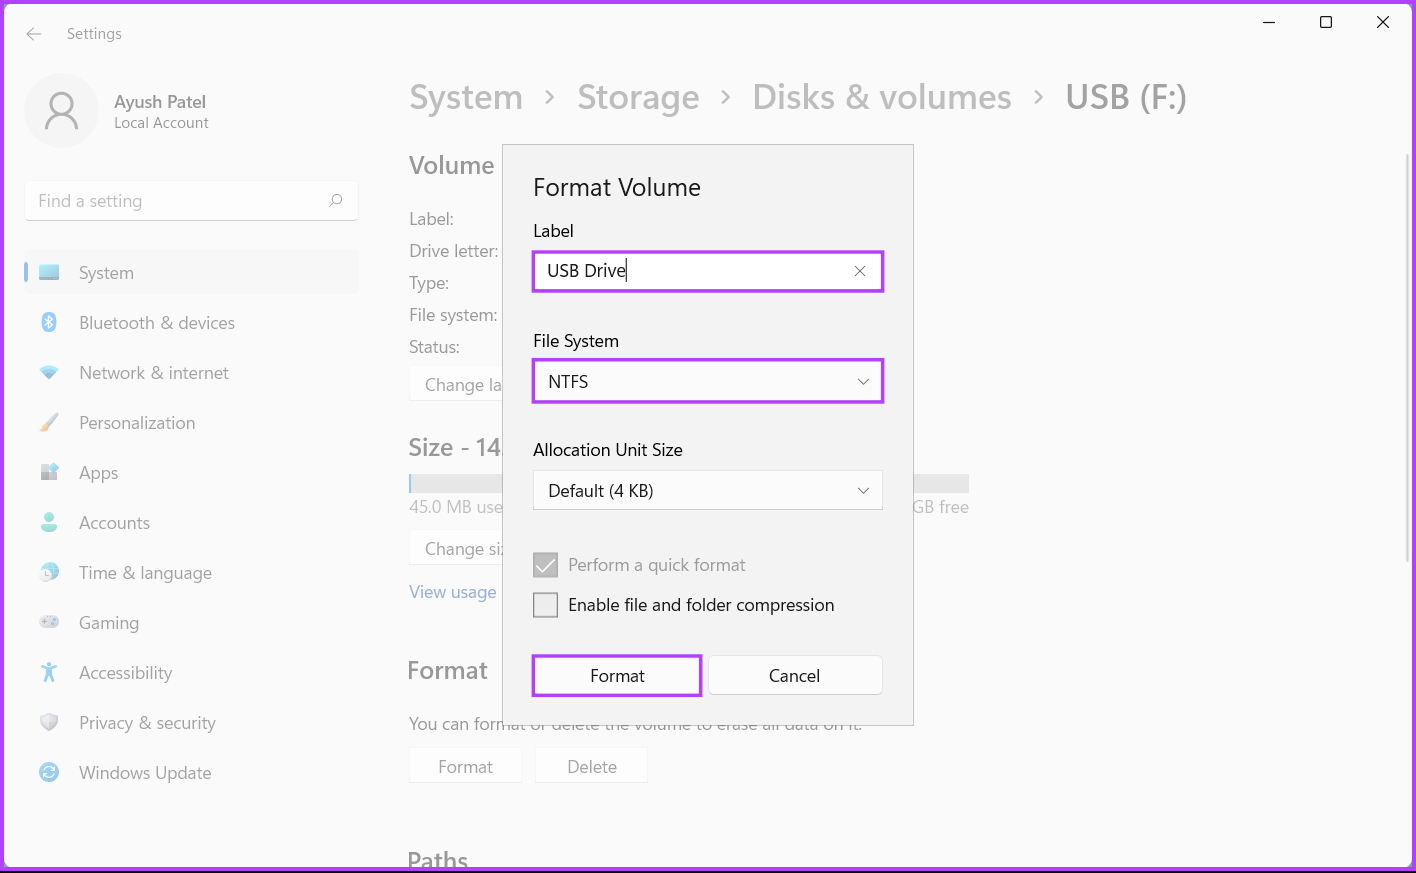
Step 7: When a Format Volume dialog appears, enter a name for your drive and use the File System drop-down to select one. Then, click on Format.
3. Format a USB Drive Using the Disk Management Utility
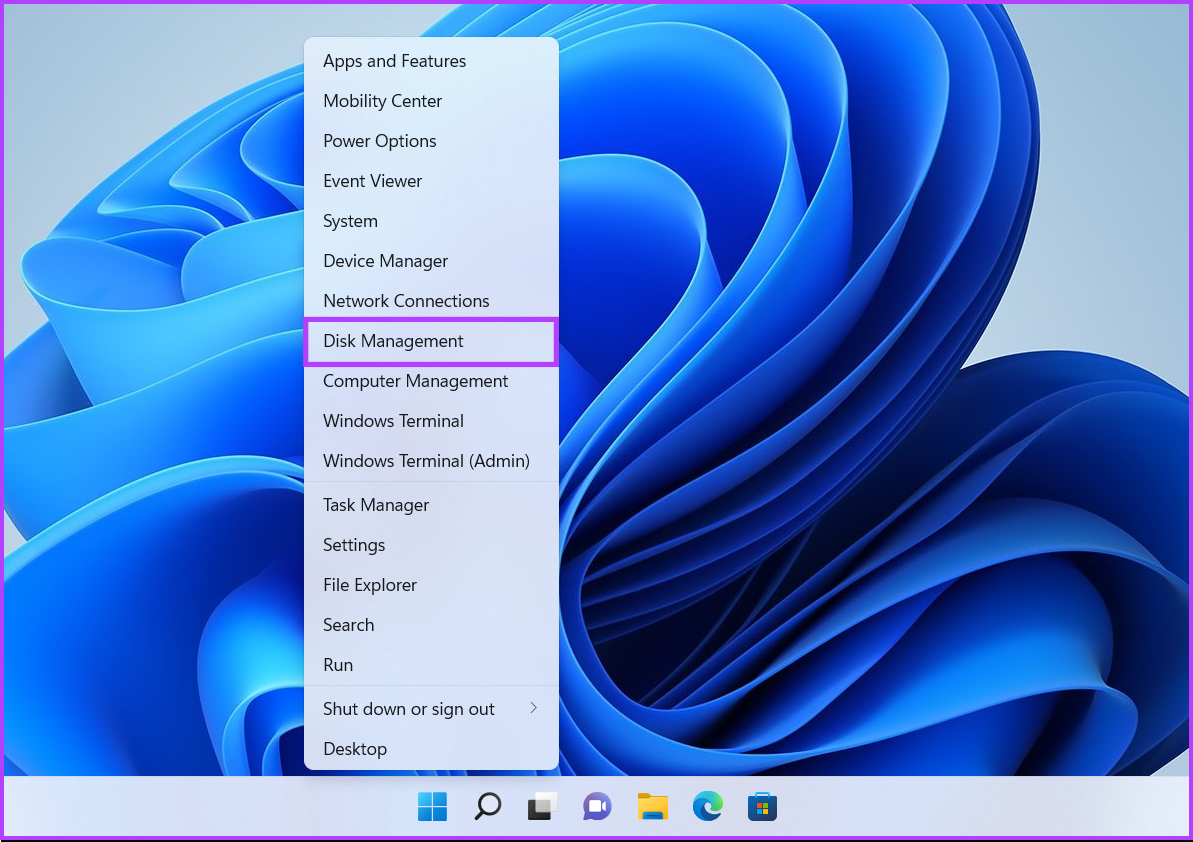
The Disk Management utility is handy to manage partitions, change drive letters, and perform other storage-related tasks, such as formatting any internal or external drives connected to your Windows 11 PC. Here’s how you can format a USB drive using the disk management utility on your Windows 11 PC: Step 1: Press the Windows + X shortcut keys to open the Power User menu and click on Disk Management.
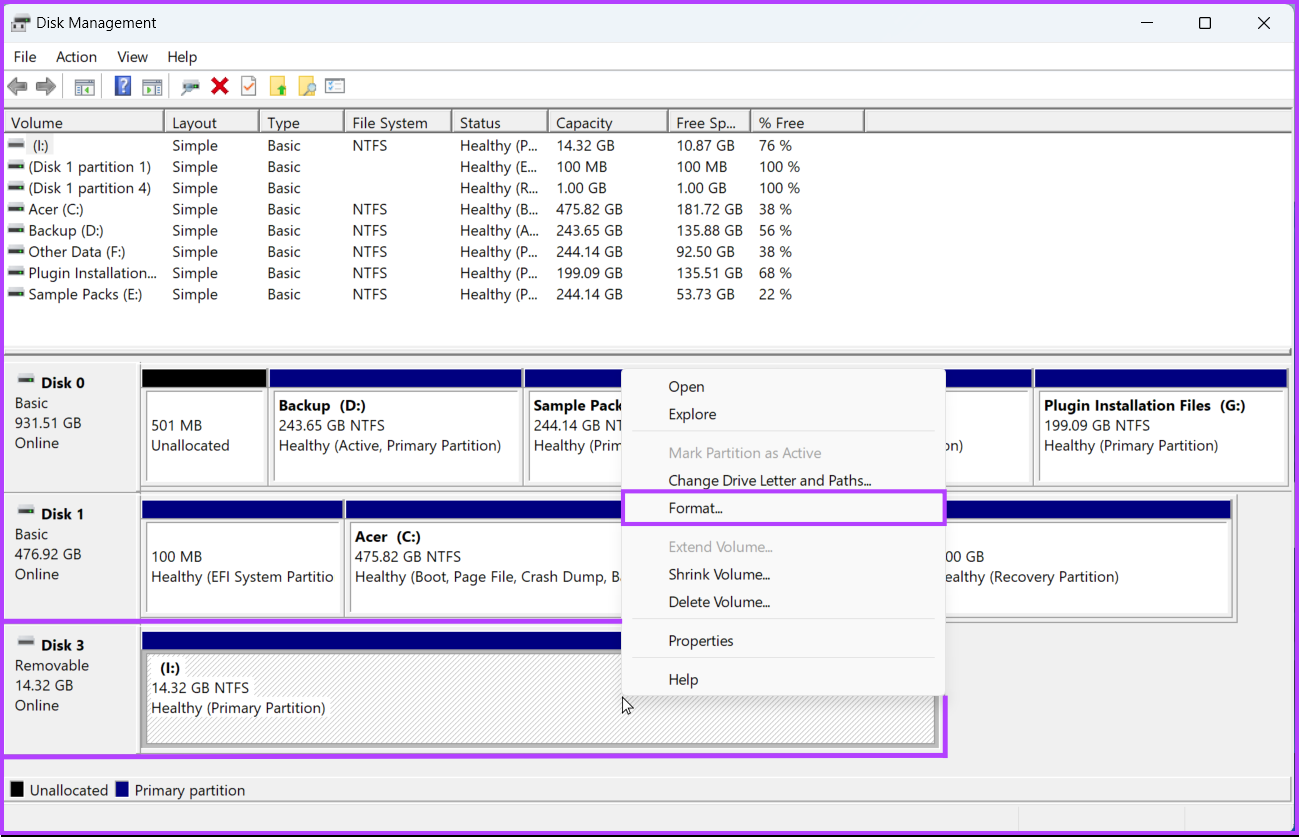
Step 2: Look for the removable USB drive you want to format and right-click on it. In the context menu that appears, click on Format. Check the capacity and drive letter of the USB drive before formatting to make sure you’ve selected the correct drive.
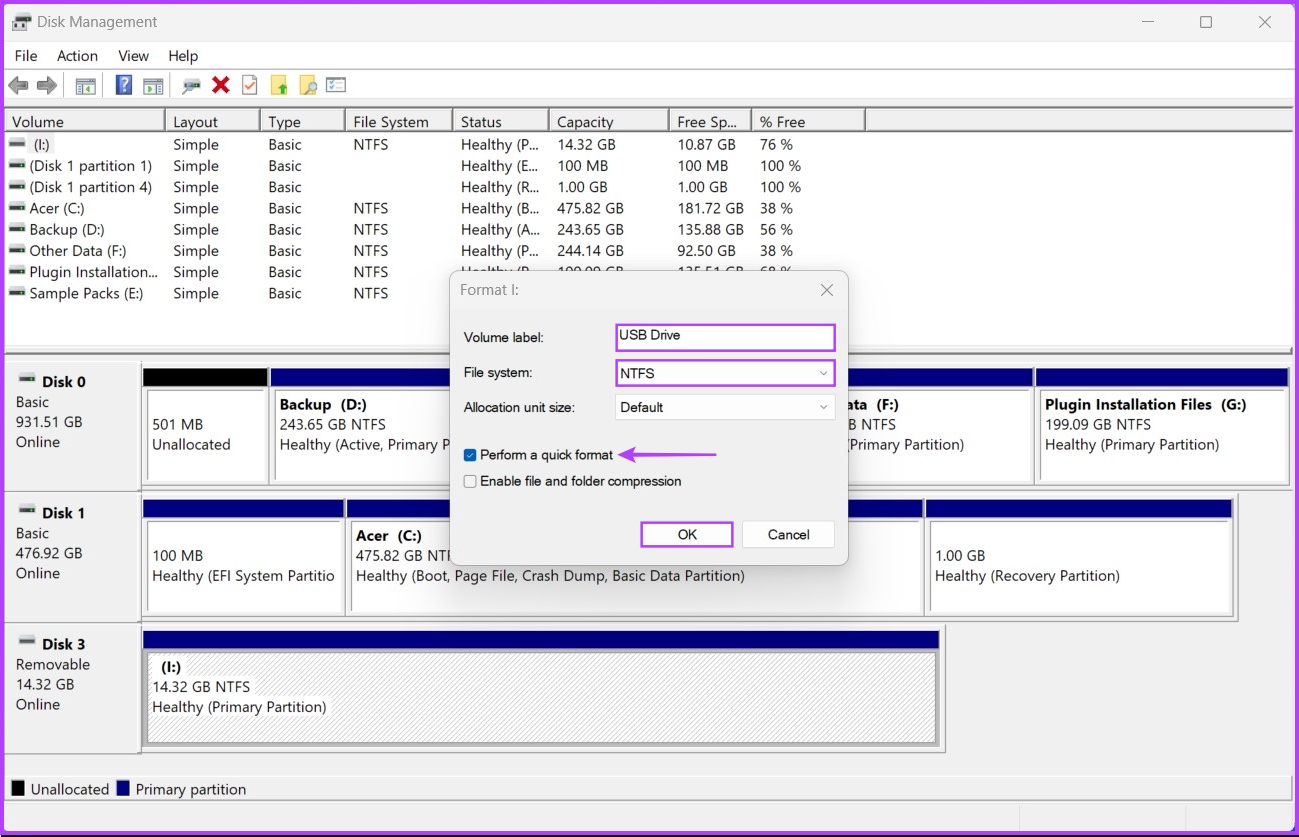
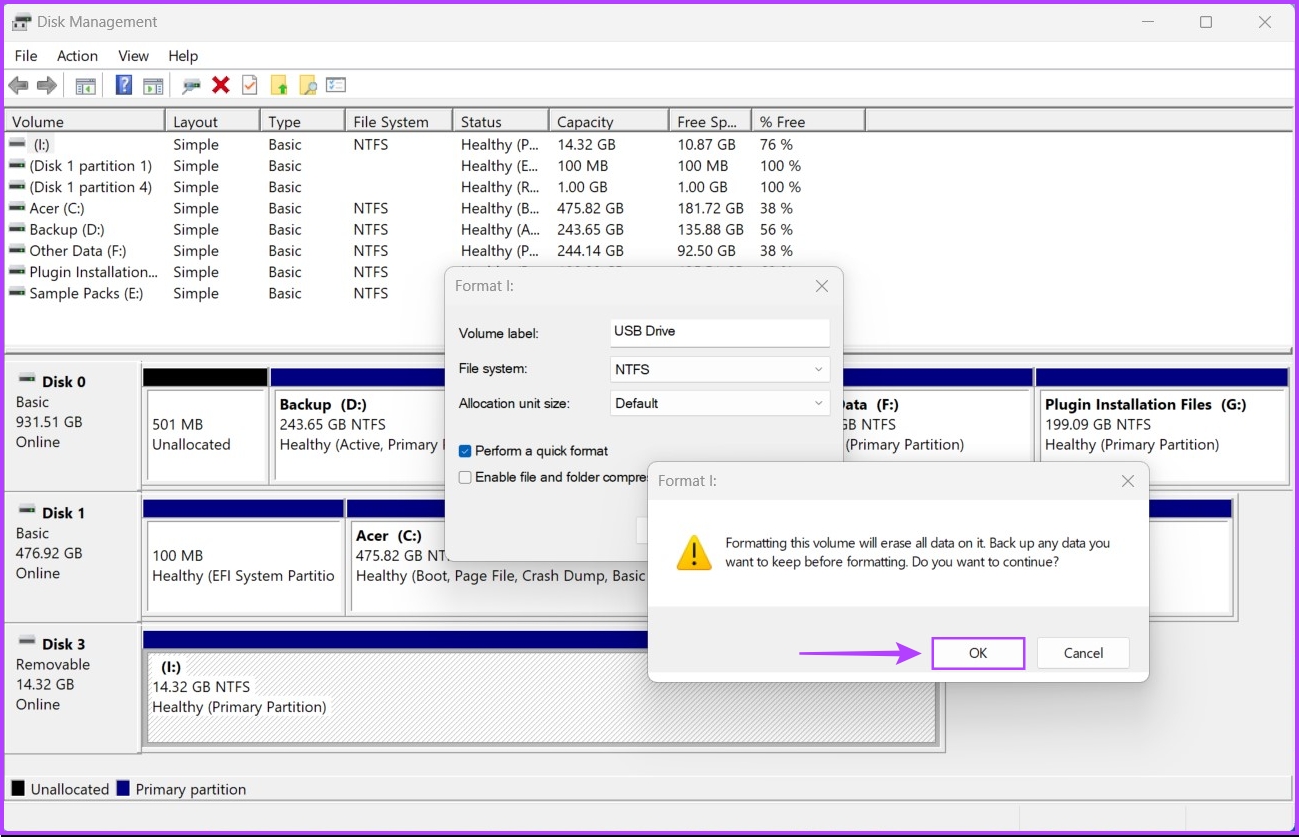
Step 3: In the Format dialog, click on the Volume label to type in a name for the USB drive, select a File system, and click OK. Alternatively, you may keep the box for ‘Perform a quick format’ checked to let Windows finish the process quickly.
Step 4: Click on OK when a confirmation dialog appears.
After that your computer will format the chosen USB drive.
4. Format a USB Drive Using Command Prompt
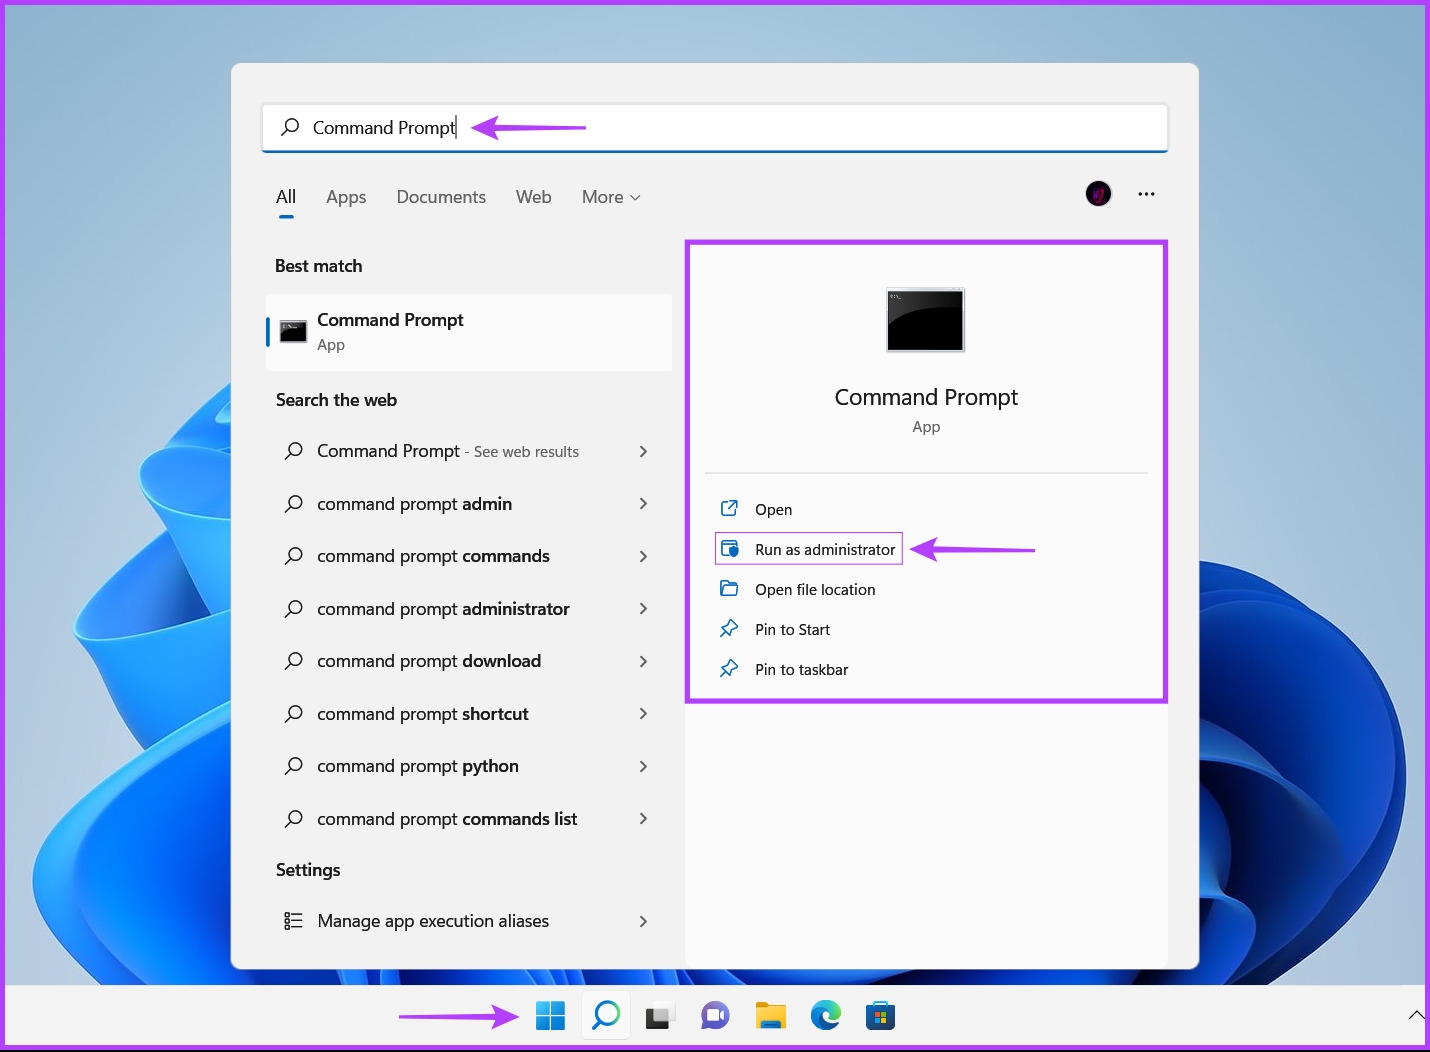
Command Prompt is undoubtedly one the most versatile command line interface (CLI) built into Windows. You can use it to process batch files, repair corrupt system files or perform advanced administrative tasks such as fixing activation key-related issues, booting your PC into safe mode, etc. You can also use it to format any internal or external drives connected to your Windows 11 PC. Here’s how you can use the Command Prompt to format a USB drive on your Windows 11 PC: Step 1: Press the Windows + S keys to launch Windows Search and type Command Prompt. From the results for the Command Prompt, click on ‘Run as administrator.’
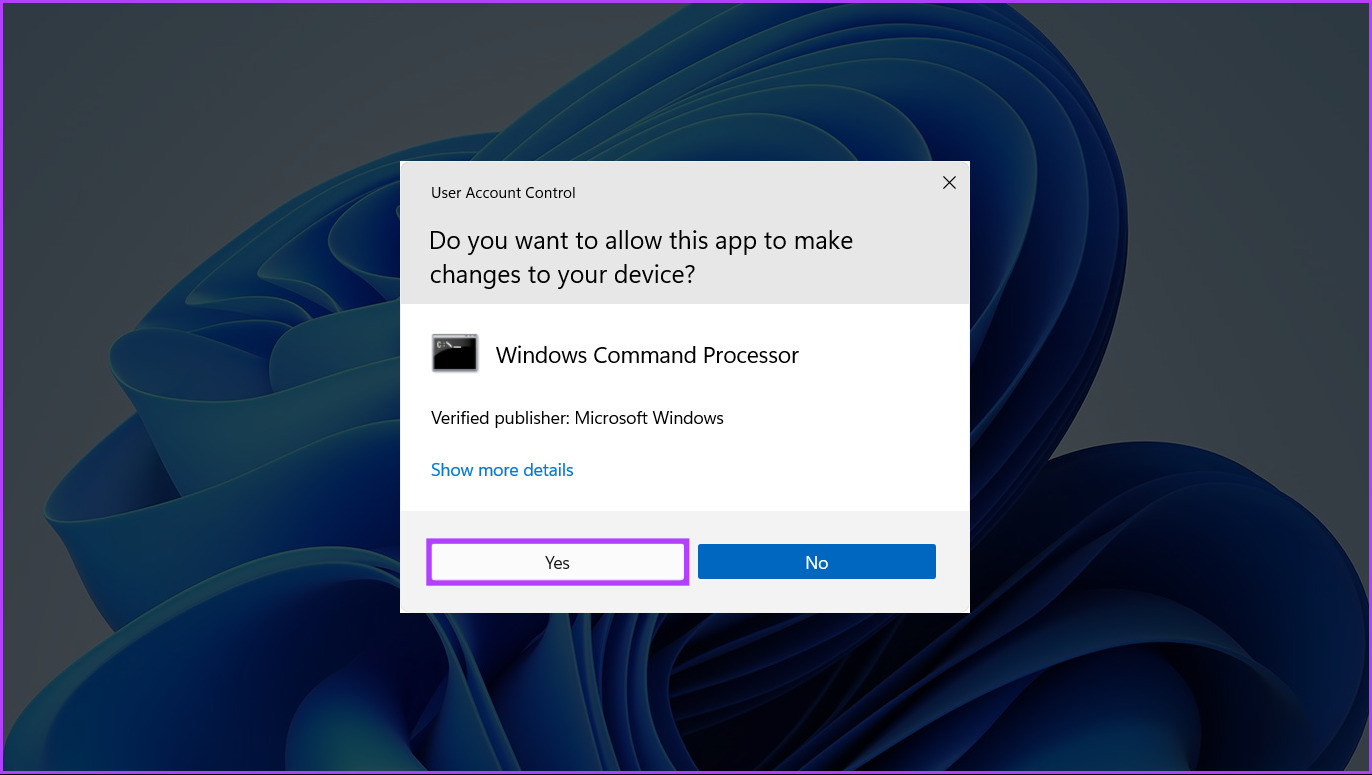
Step 2: When a User Account Control (UAC) prompt appears, click on Yes.
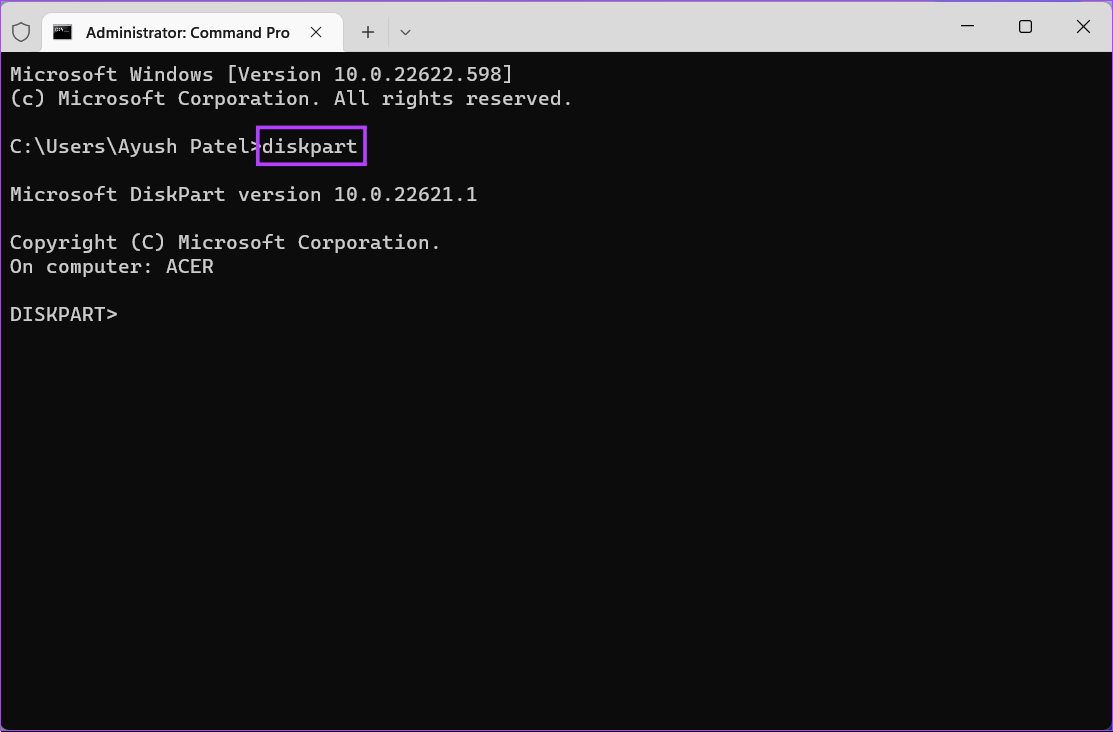
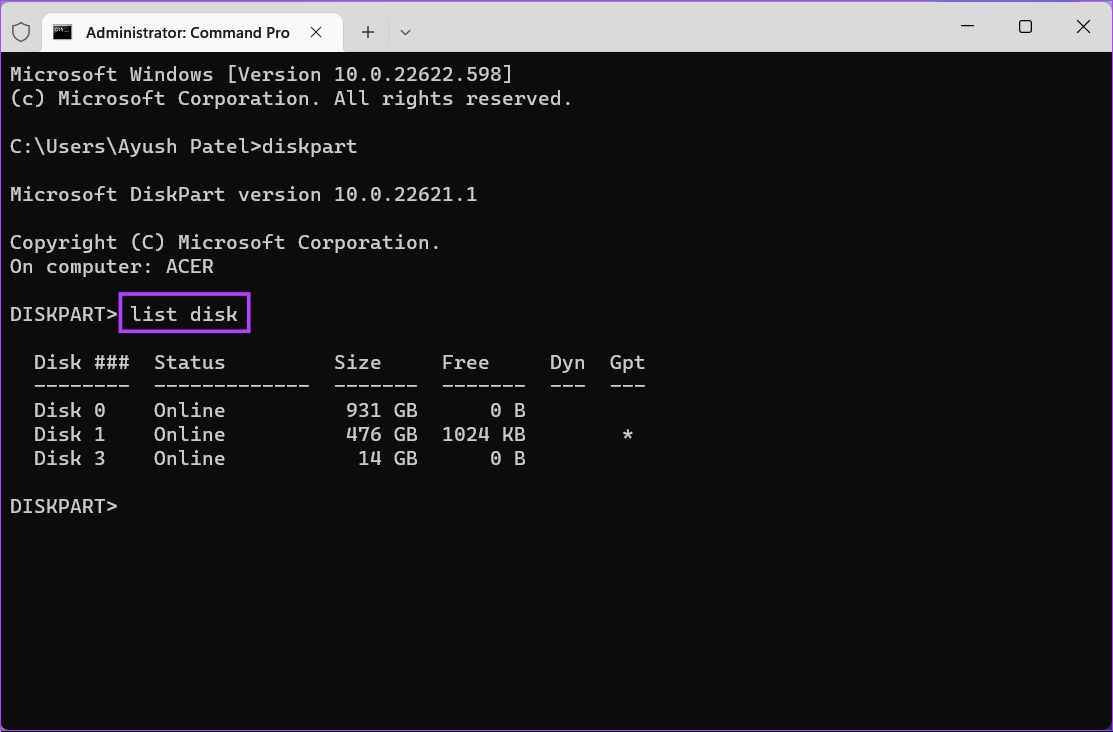
Step 3: Type the following command and press Enter to launch the Diskpart utility:
Step 4: Type the following command and press Enter to view a list of the available drives:
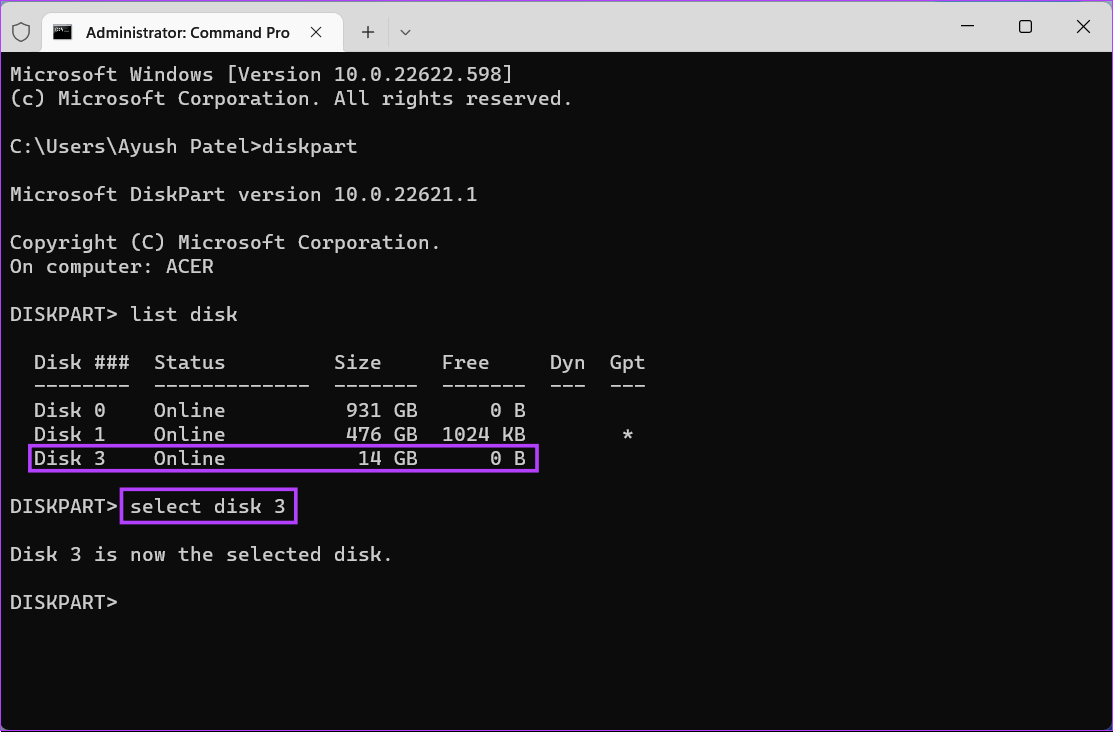
Step 5: Type the following command and press Enter to select the USB drive you want to format: Replace ‘3’ with your USB drive’s number. Your USB drive might have a different disk number.
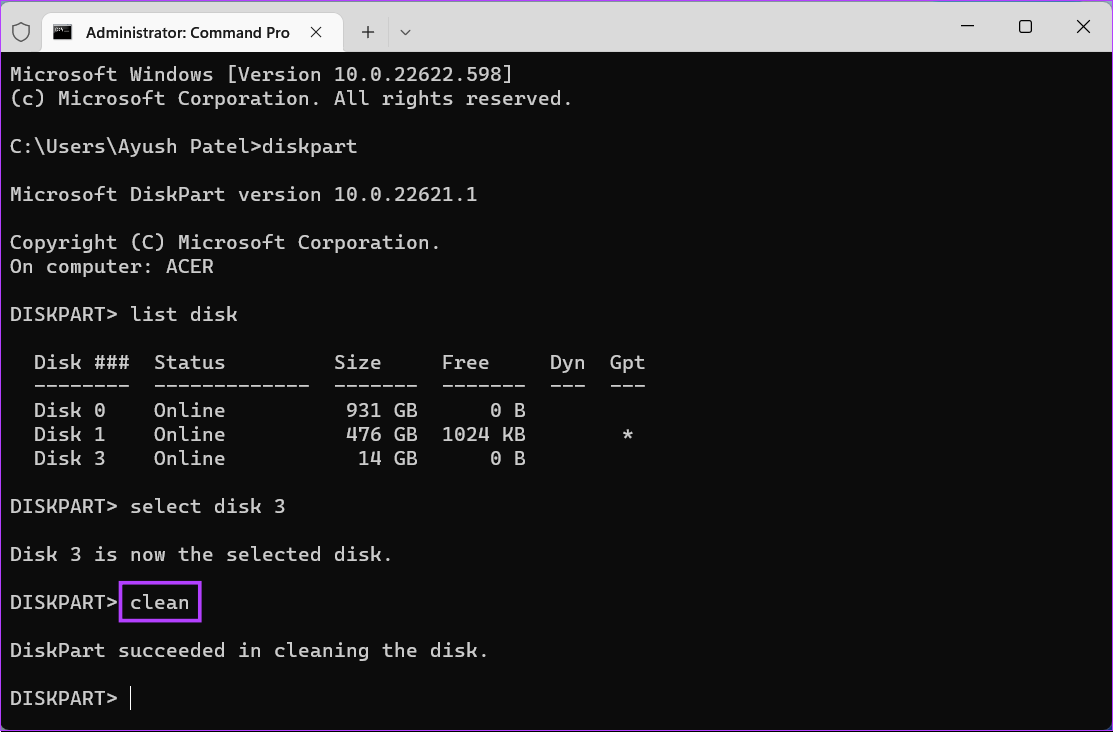
Step 6: Type the following command and press Enter to delete all the storage partitions.
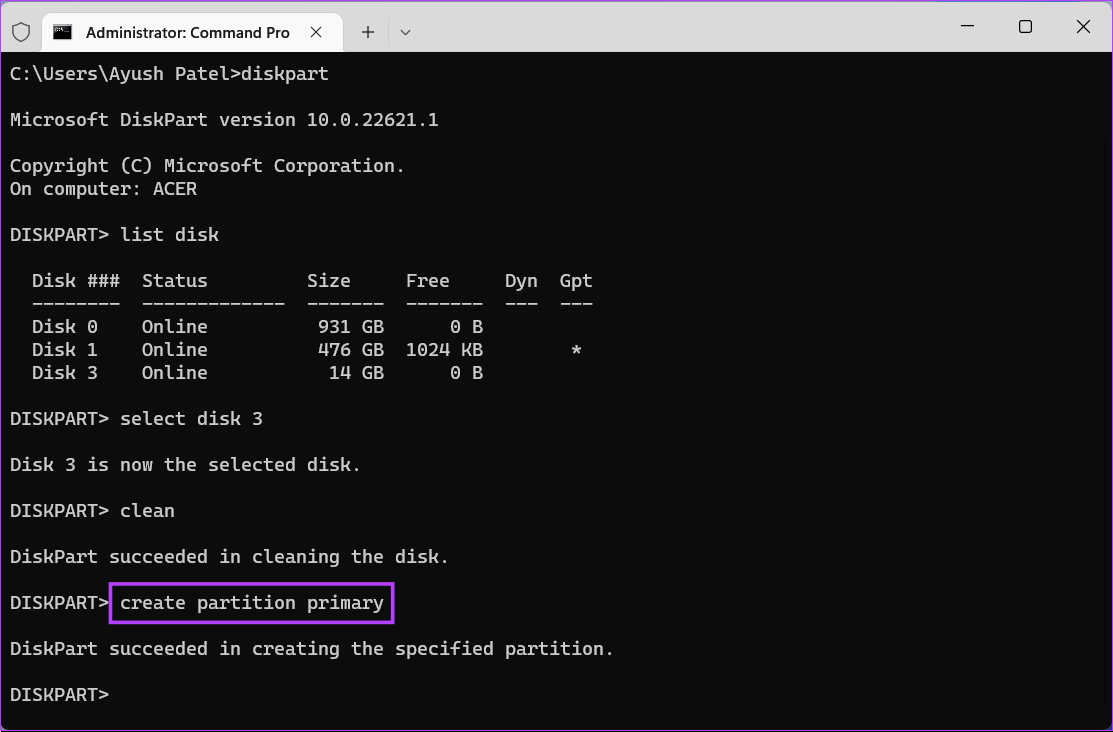
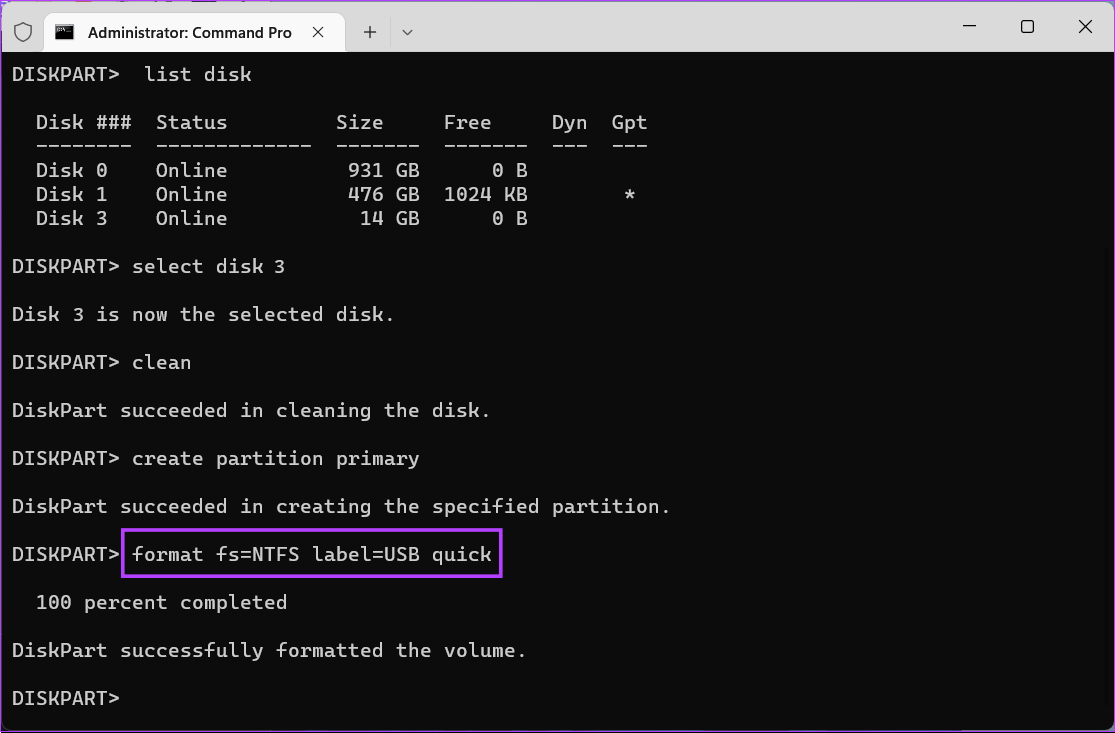
Step 7: Type the following command and press Enter to create a primary partition.
Step 8: Type the following command and press Enter to perform a quick format. If you want to change the file system for your USB drive, replace ‘NTFS’ with exFAT or FAT32. Meanwhile, if you want to change the drive label, replace ‘USB’ with something else (spaces aren’t supported).
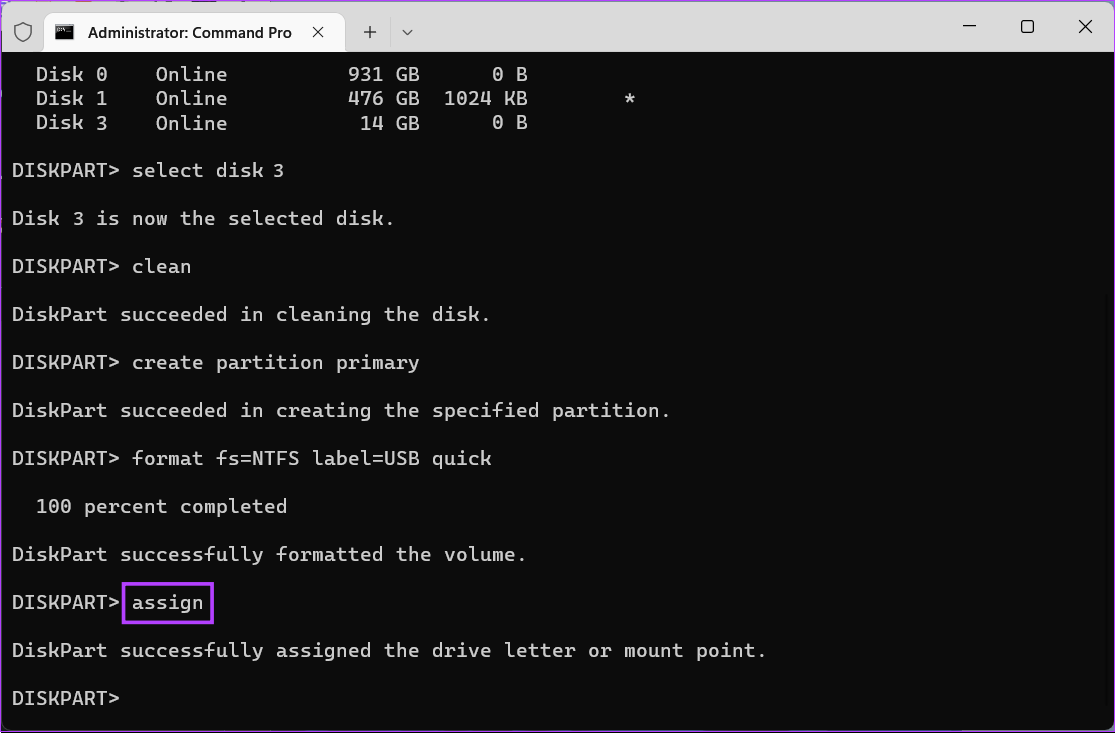
Step 9: Type the following command and press Enter to assign a random drive letter to the formatted USB drive.
5. Format a USB Drive Using Windows PowerShell
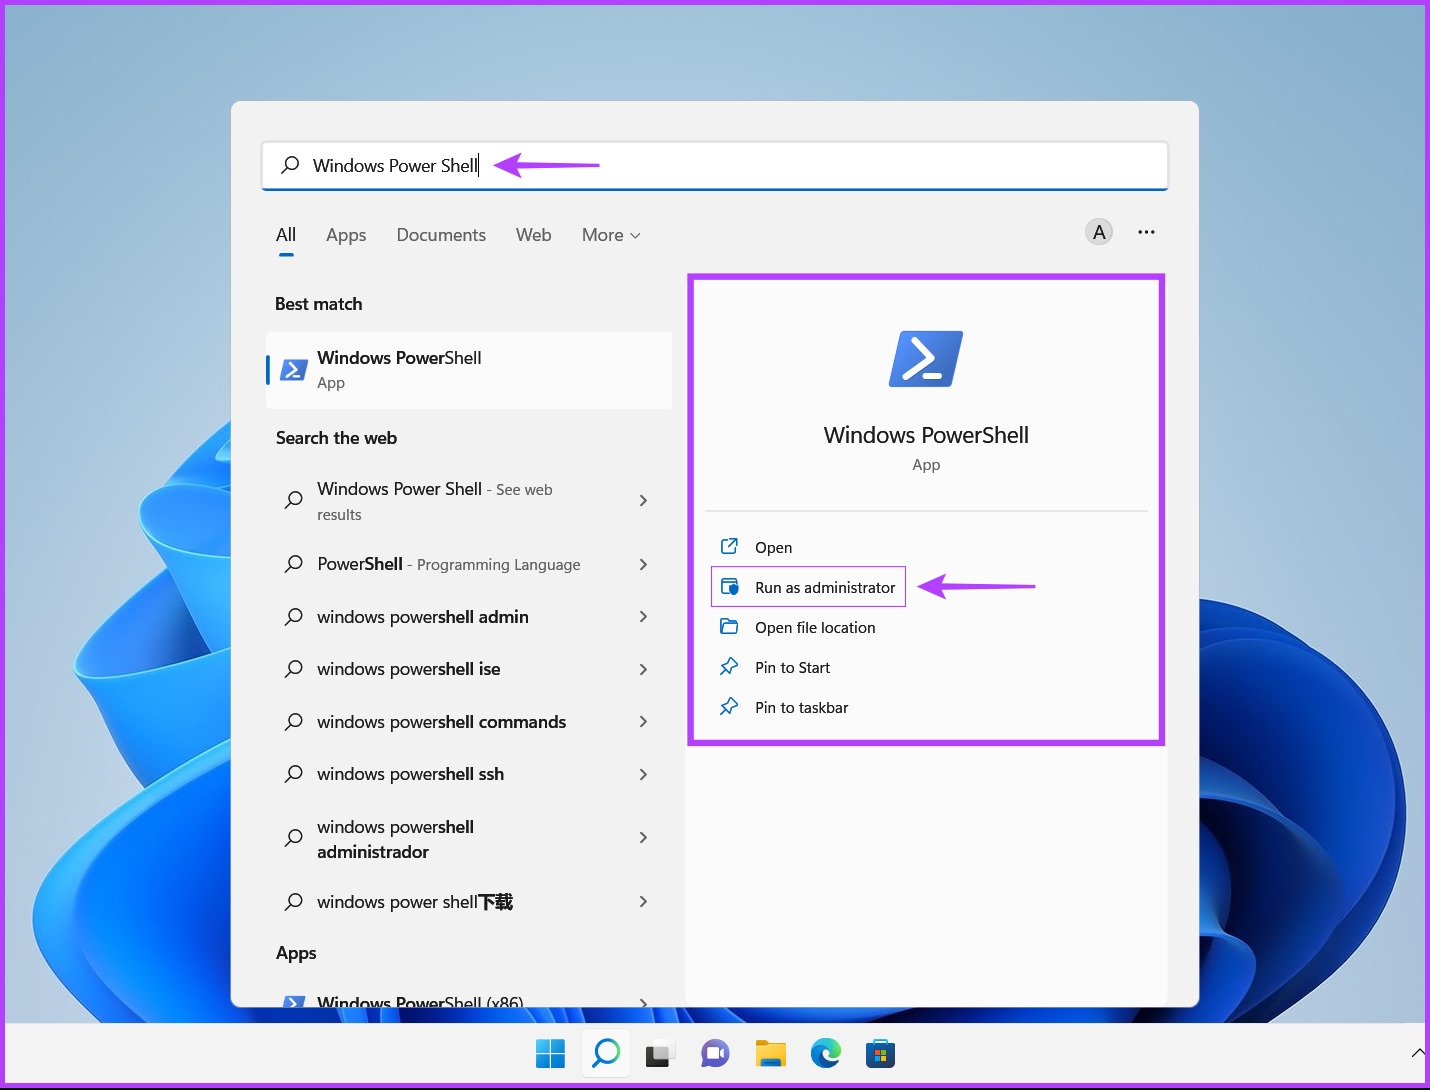
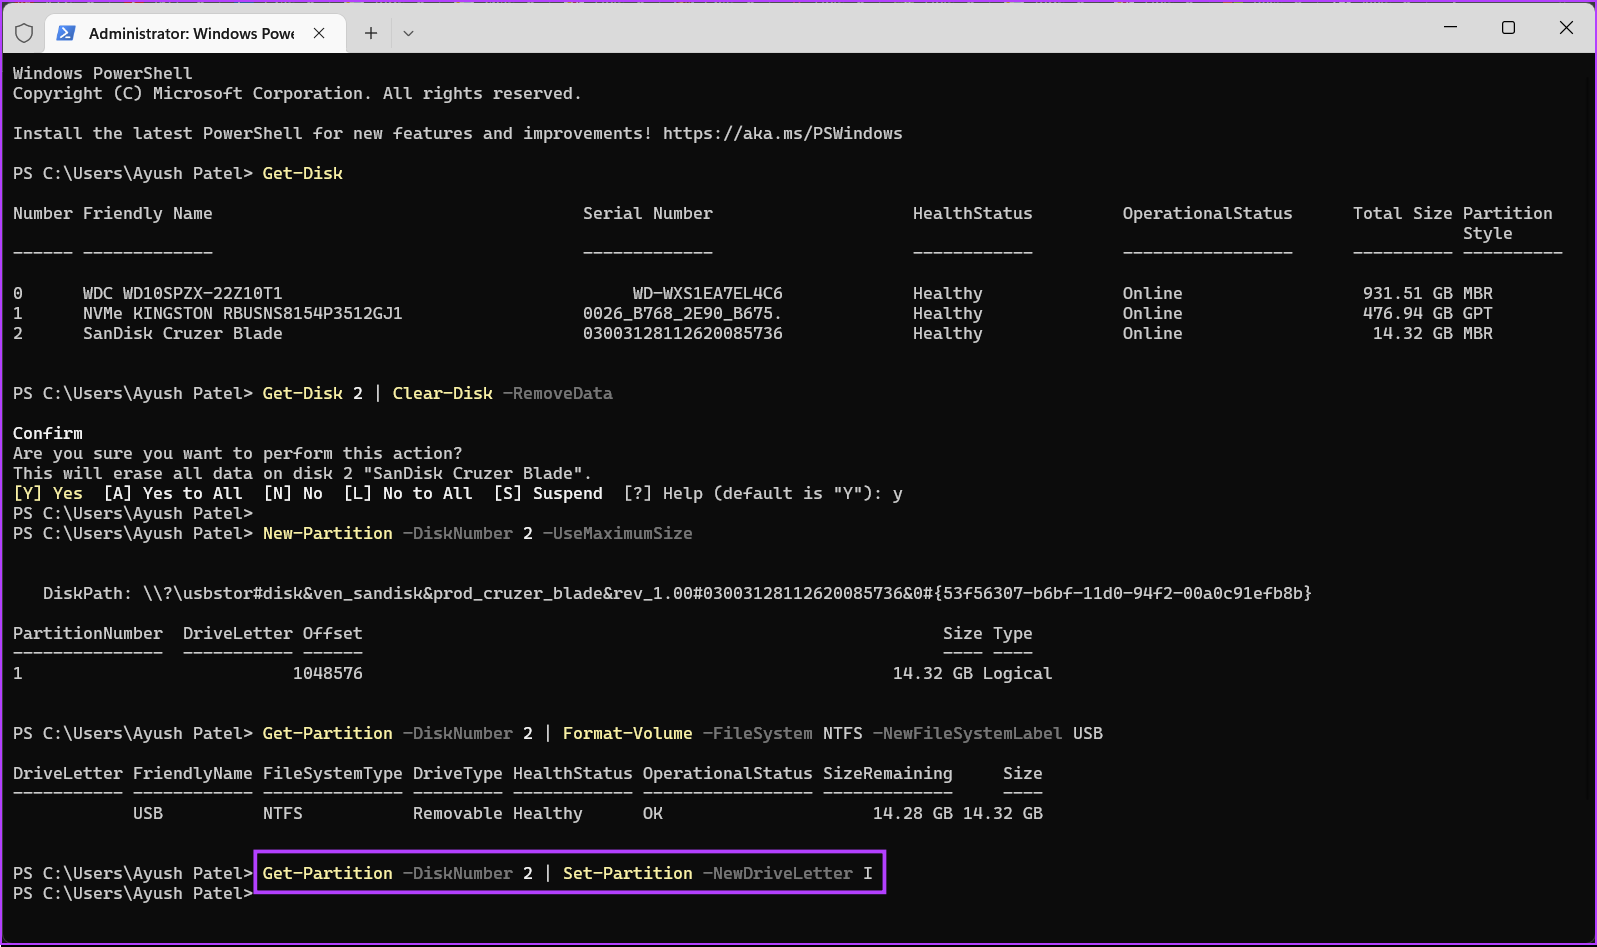
Besides the Command Prompt, you can also use Windows PowerShell to execute almost all administrative tasks on your PC. Here’s how you can use Windows PowerShell to format any USB drive connected to your Windows 11 PC: Step 1: Press the Windows + S keys to open Windows Search and type Windows PowerShell. Then, from the results for the Command Prompt, click on ‘Run as administrator.’
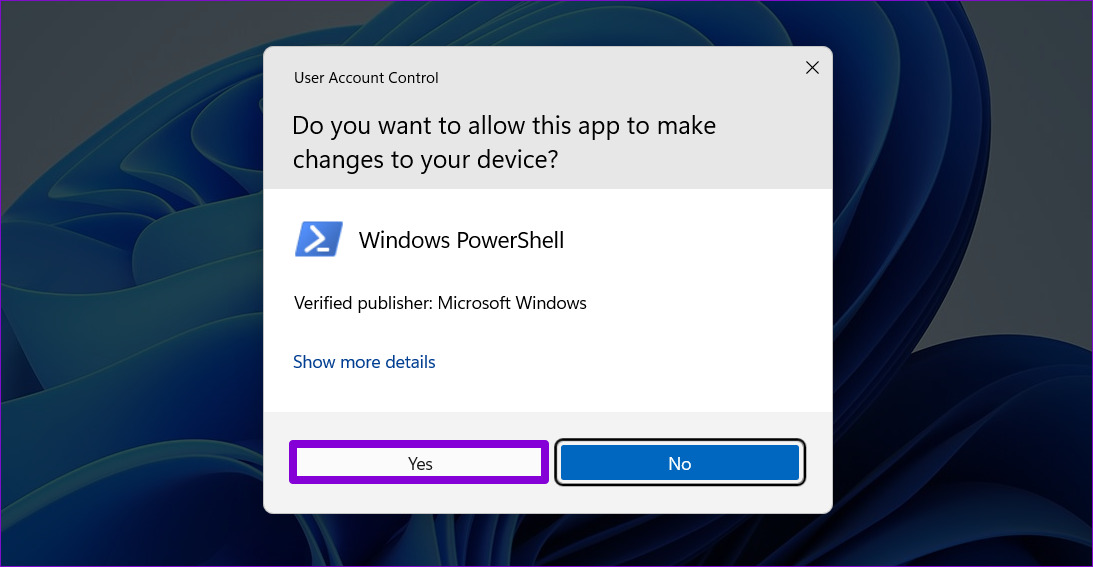
Step 2: When a User Account Control (UAC) prompt appears, click on Yes.
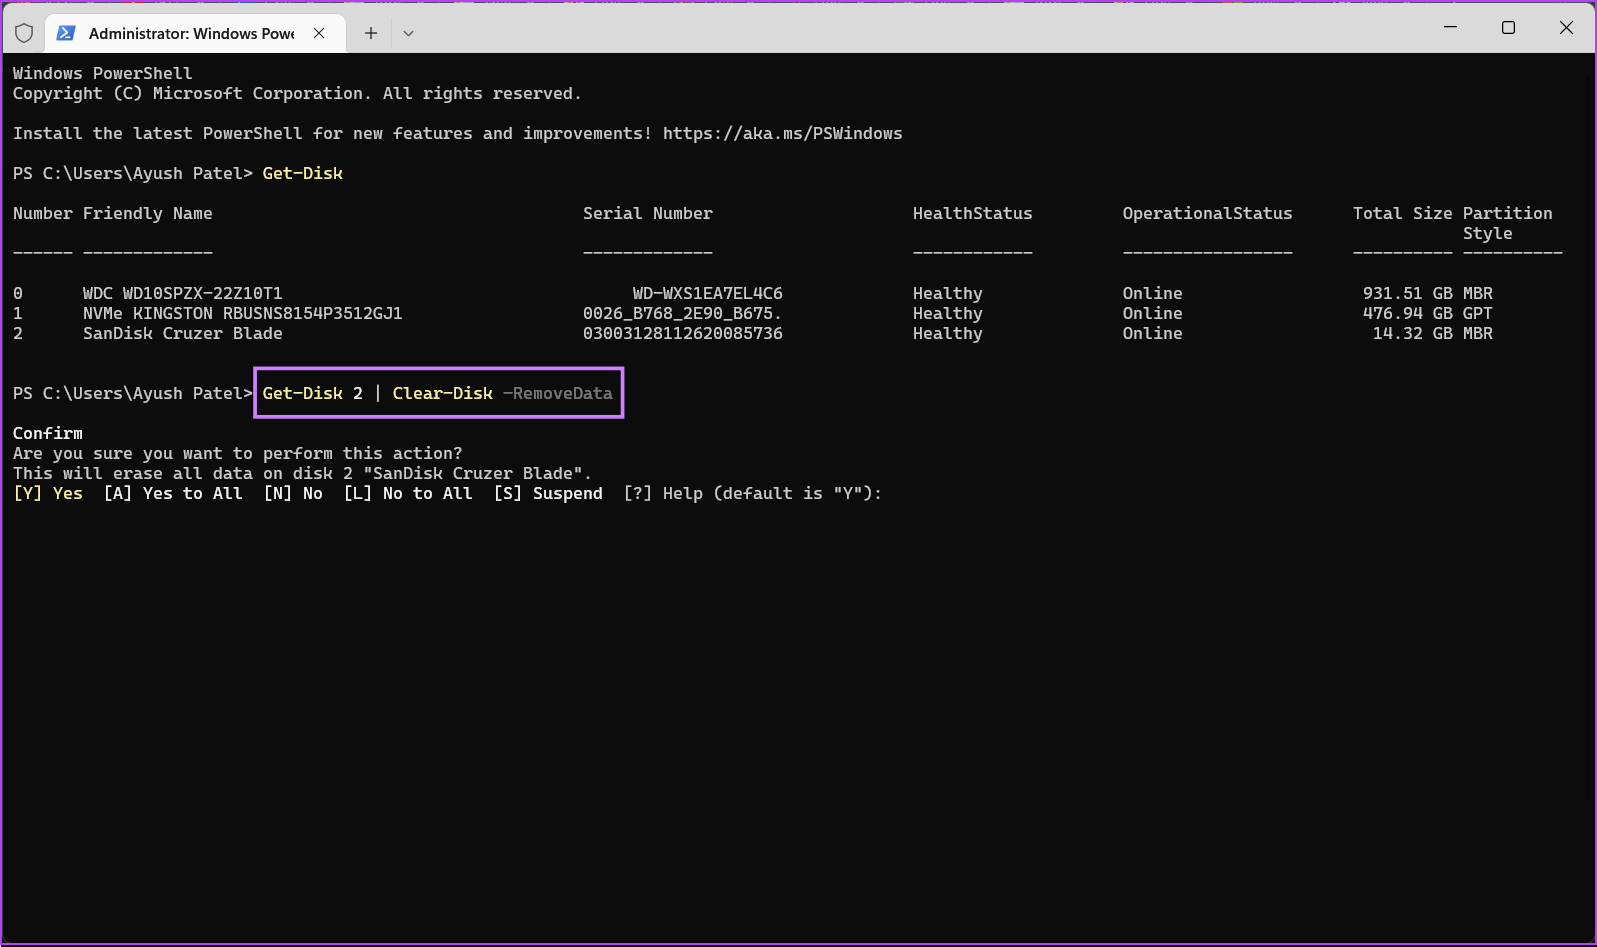
Step 3: Type the following command and press Enter to to view a list of the connected drives.
Step 4: Type the following command and press Enter to select your USB drive and erase all its data and configuration files. Don’t forget to replace ‘3’ with your USB drive’s number. Your USB drive might have a different disk number.
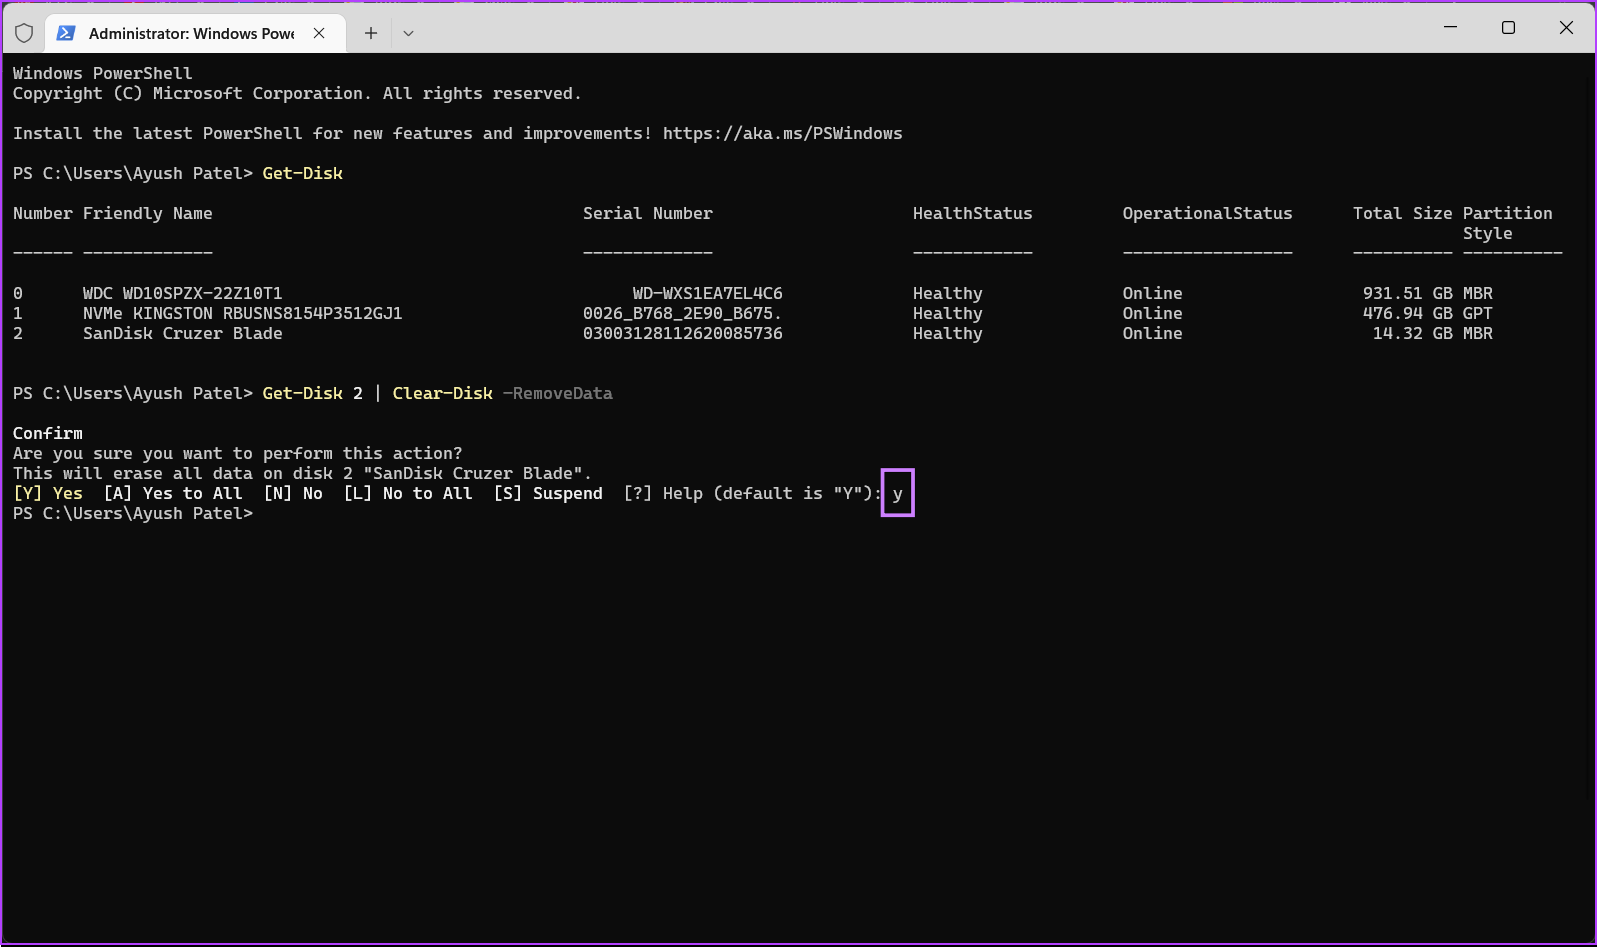
Step 5: Type the following letter and press Enter to confirm your decision to clear all the data and configuration files on your USB drive.
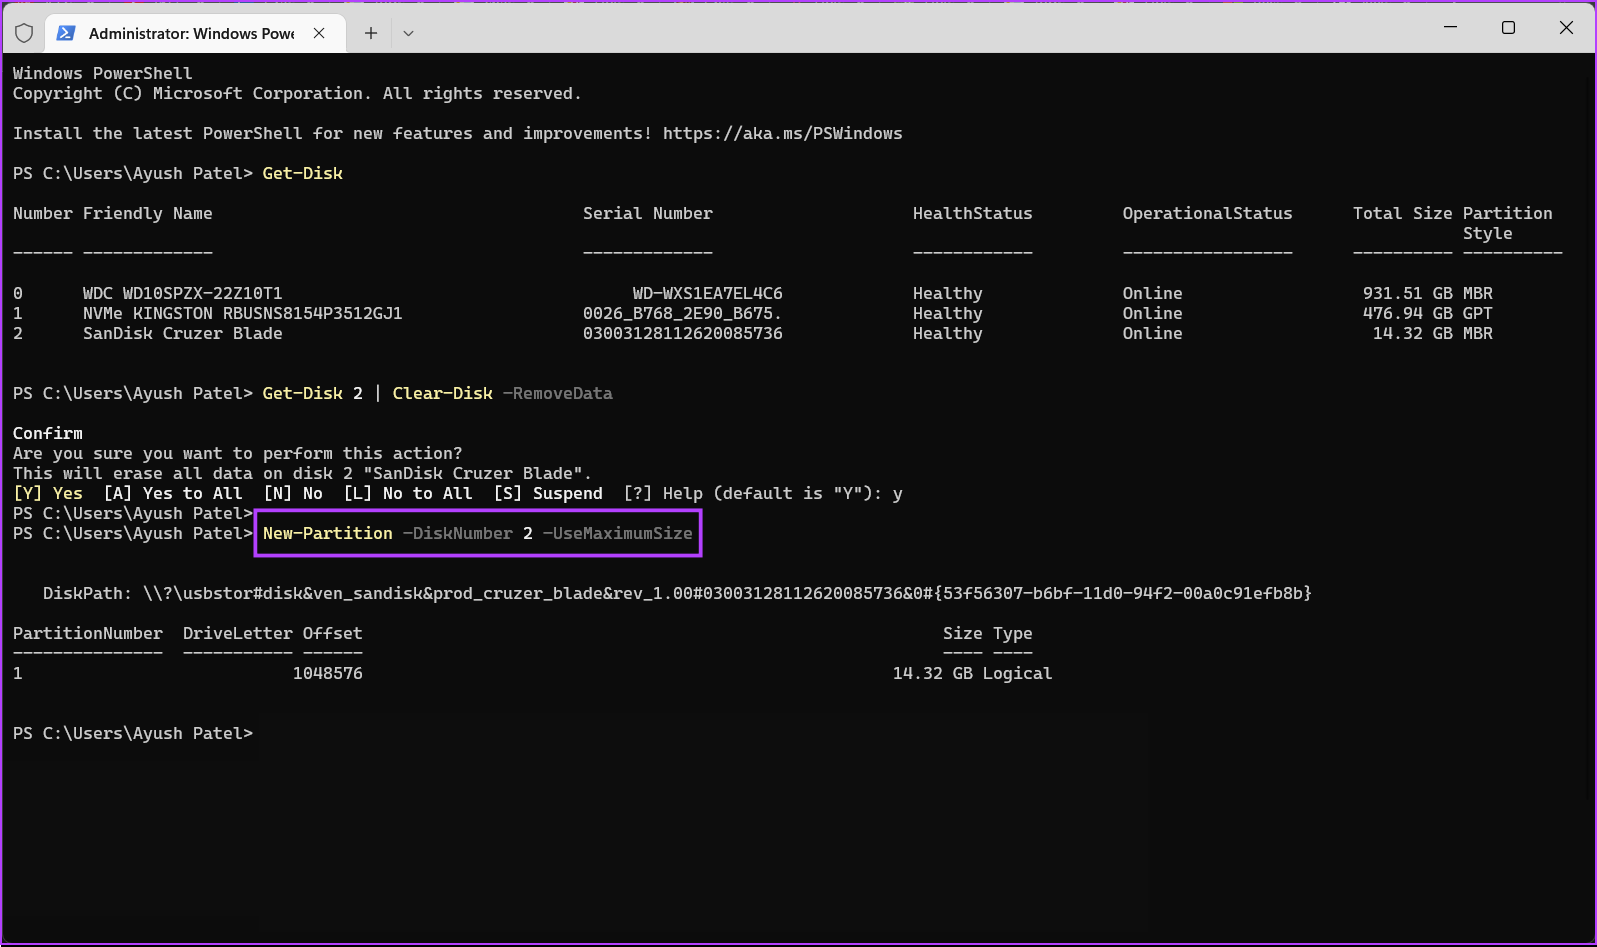
Step 6: Type the following command and press Enter to create a drive partition.
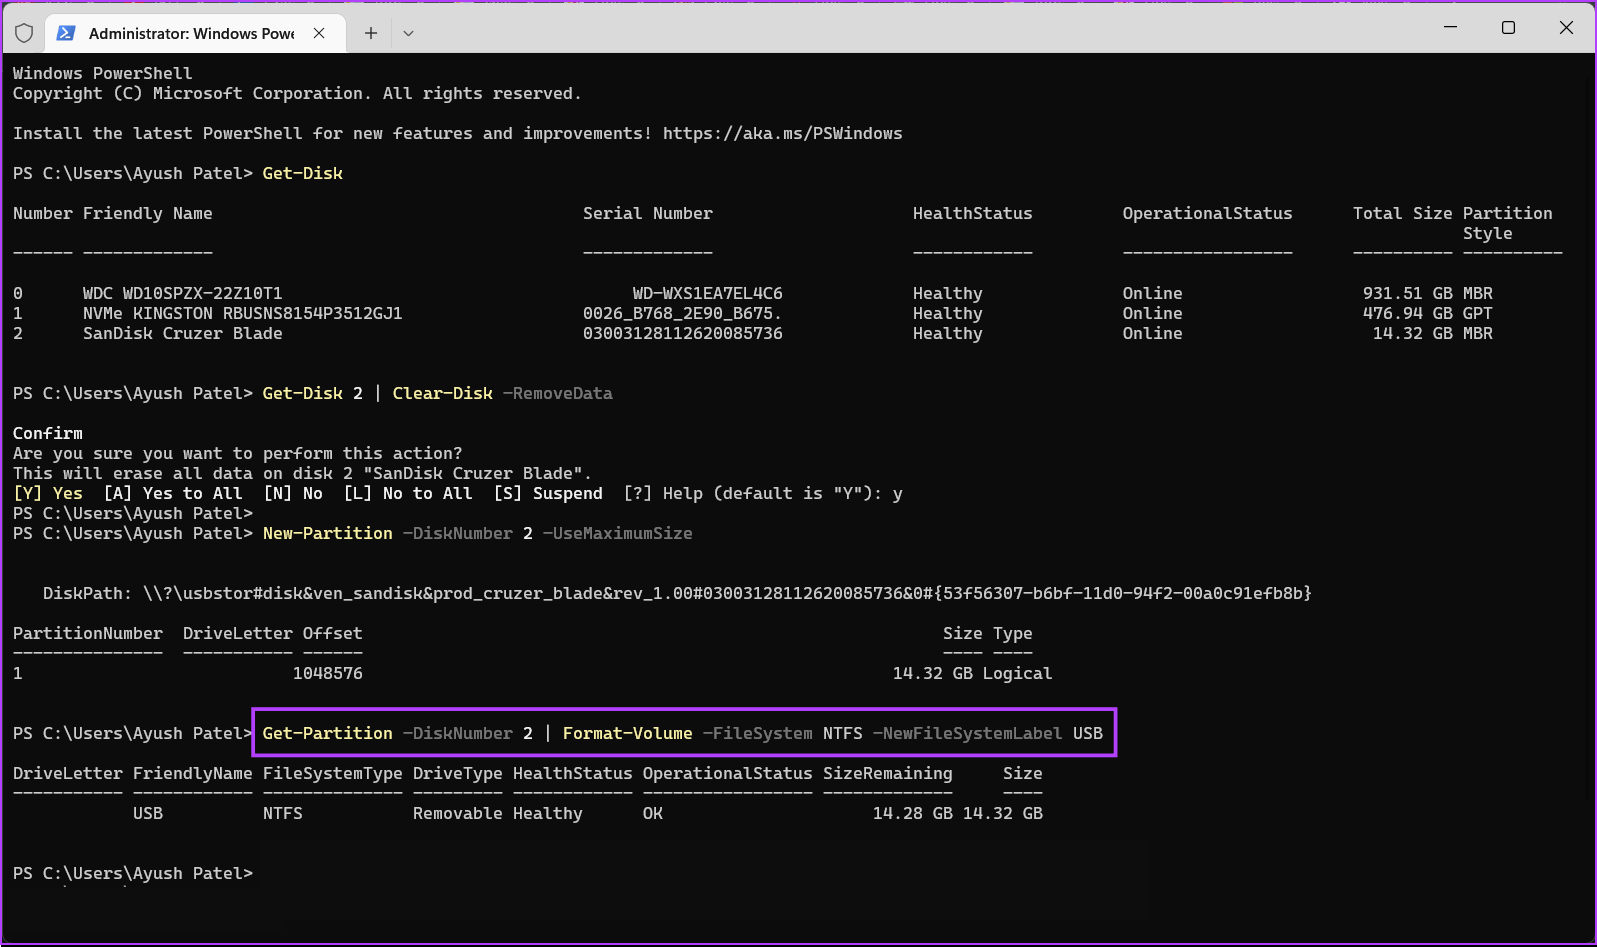
Step 7: Type the following command and press Enter to commence a quick format, select a file system and assign a drive label. If you want to change the file system for your USB drive, replace ‘NTFS’ with exFAT or FAT32. Meanwhile, if you want to change the drive label, replace ‘USB’ with something else (spaces aren’t supported).
Step 8: Type the following command and press Enter to assign a drive letter.
Safely Erase Any USB Drive On Windows 11
That’s all. You can safely format a USB drive connected to your Windows 11 PC using any of the above methods. The best thing about these methods is that you don’t need to waste your precious time downloading third-party apps or programs to do so. The above article may contain affiliate links which help support Guiding Tech. However, it does not affect our editorial integrity. The content remains unbiased and authentic.
